# 一、项目介绍
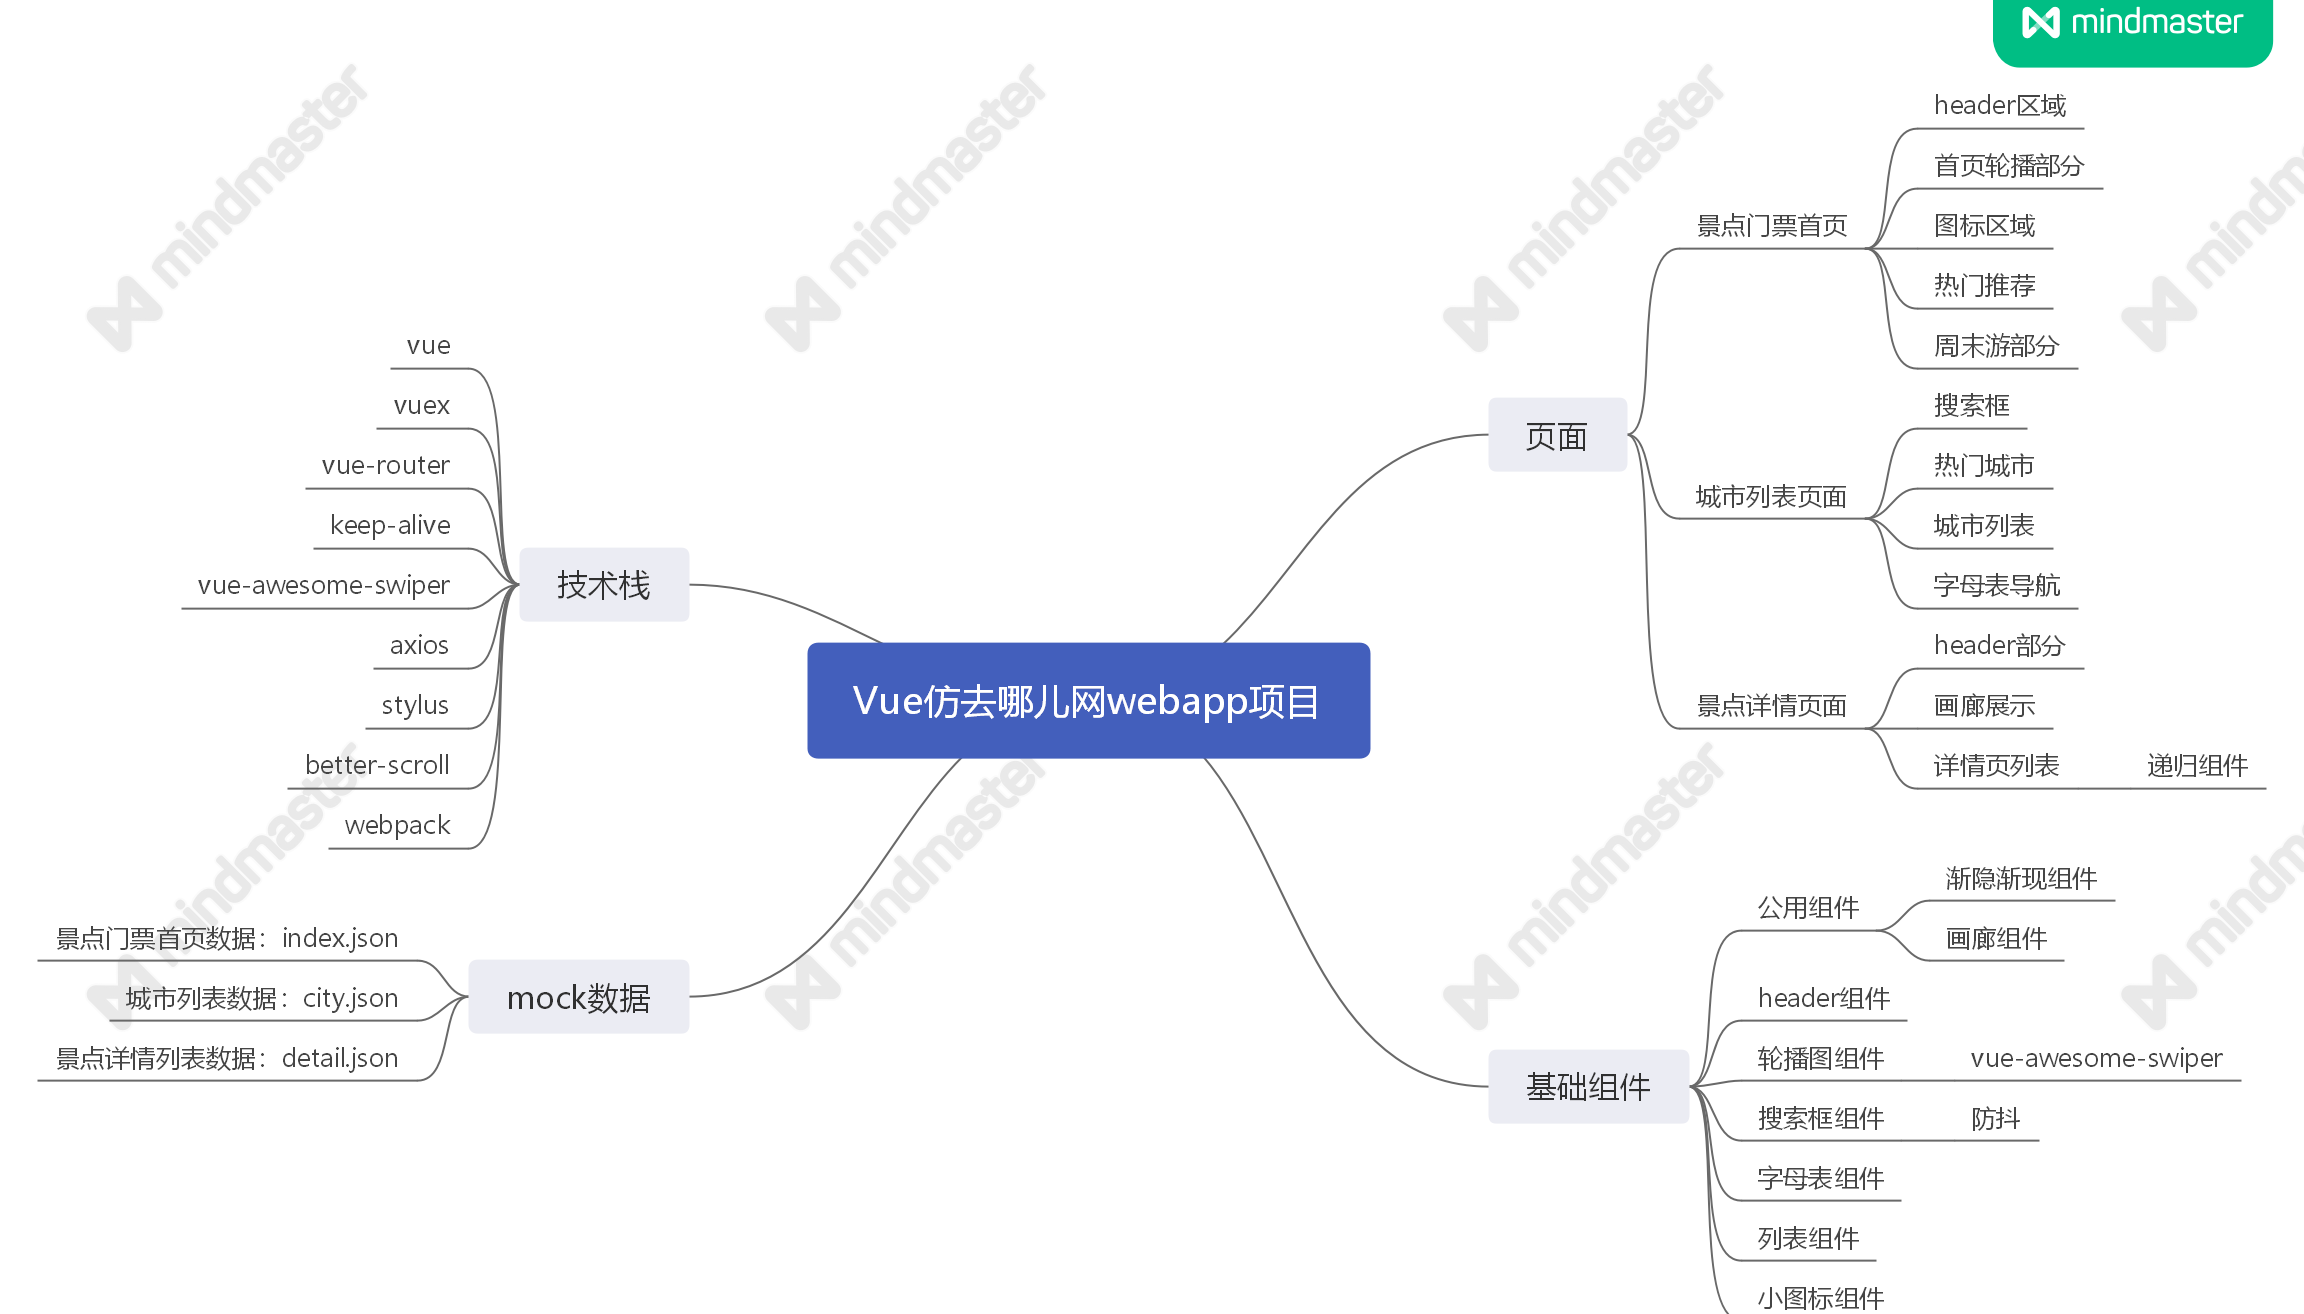
这个项目主要参考了去哪儿网的布局,完成了首页、城市选择页面、详情页面的开发。
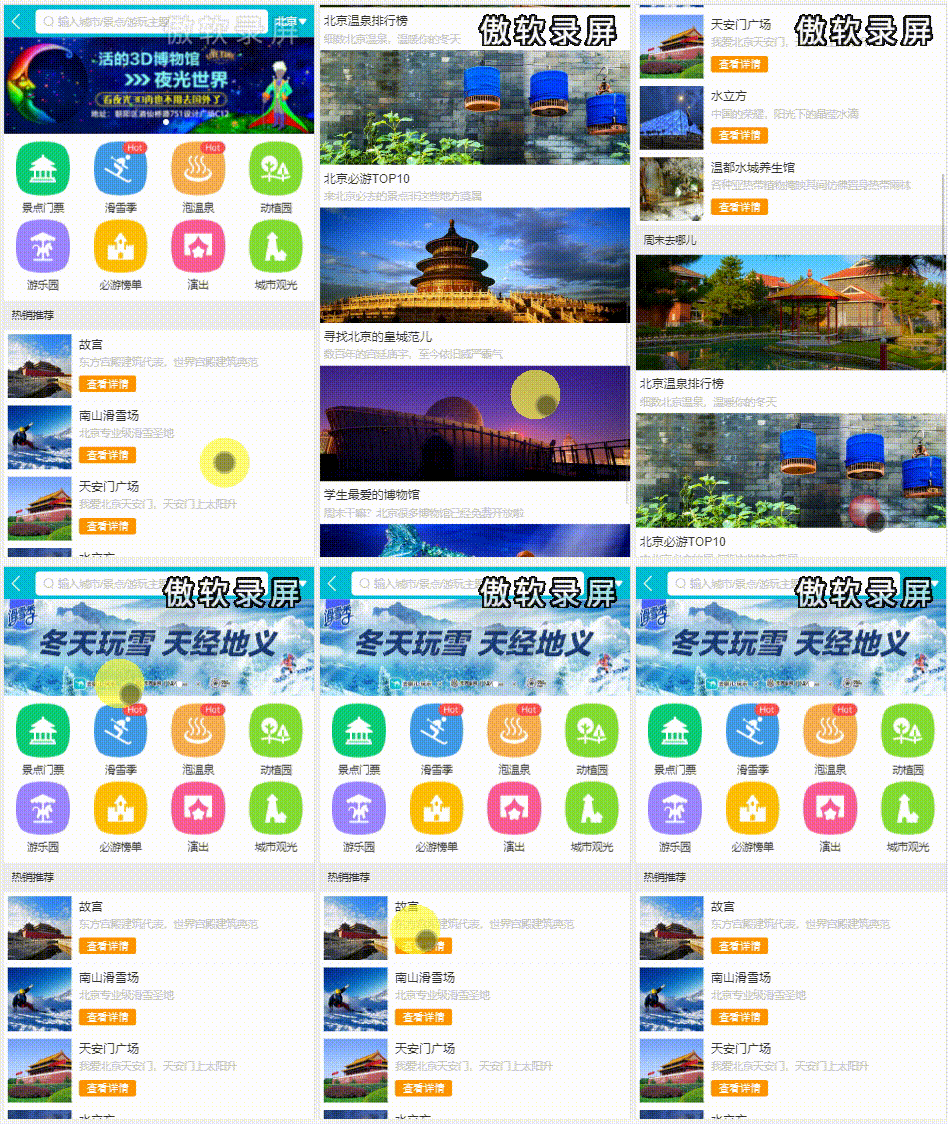
- [x] 首页:实现了多区域轮播的功能,以及多区域列表的展示;
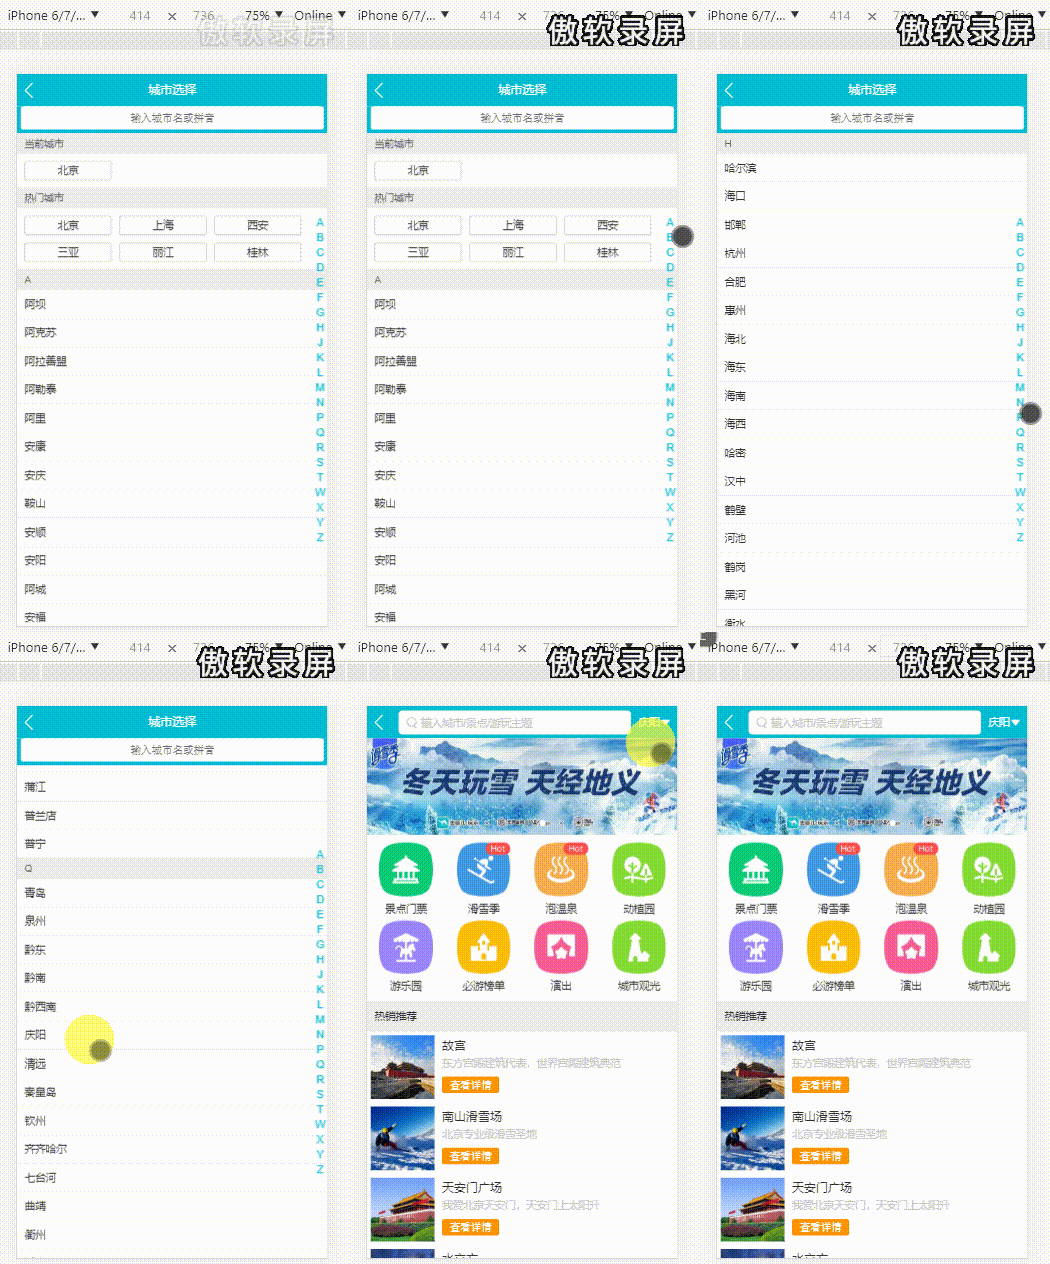
- [x] 城市选择页面:在这个页面实现了城市展示、城市搜索、城市右侧字母和左侧区块动态联动的效果,当用户在城市列表切换了新的城市后,首页对应的城市也会跟着变化;
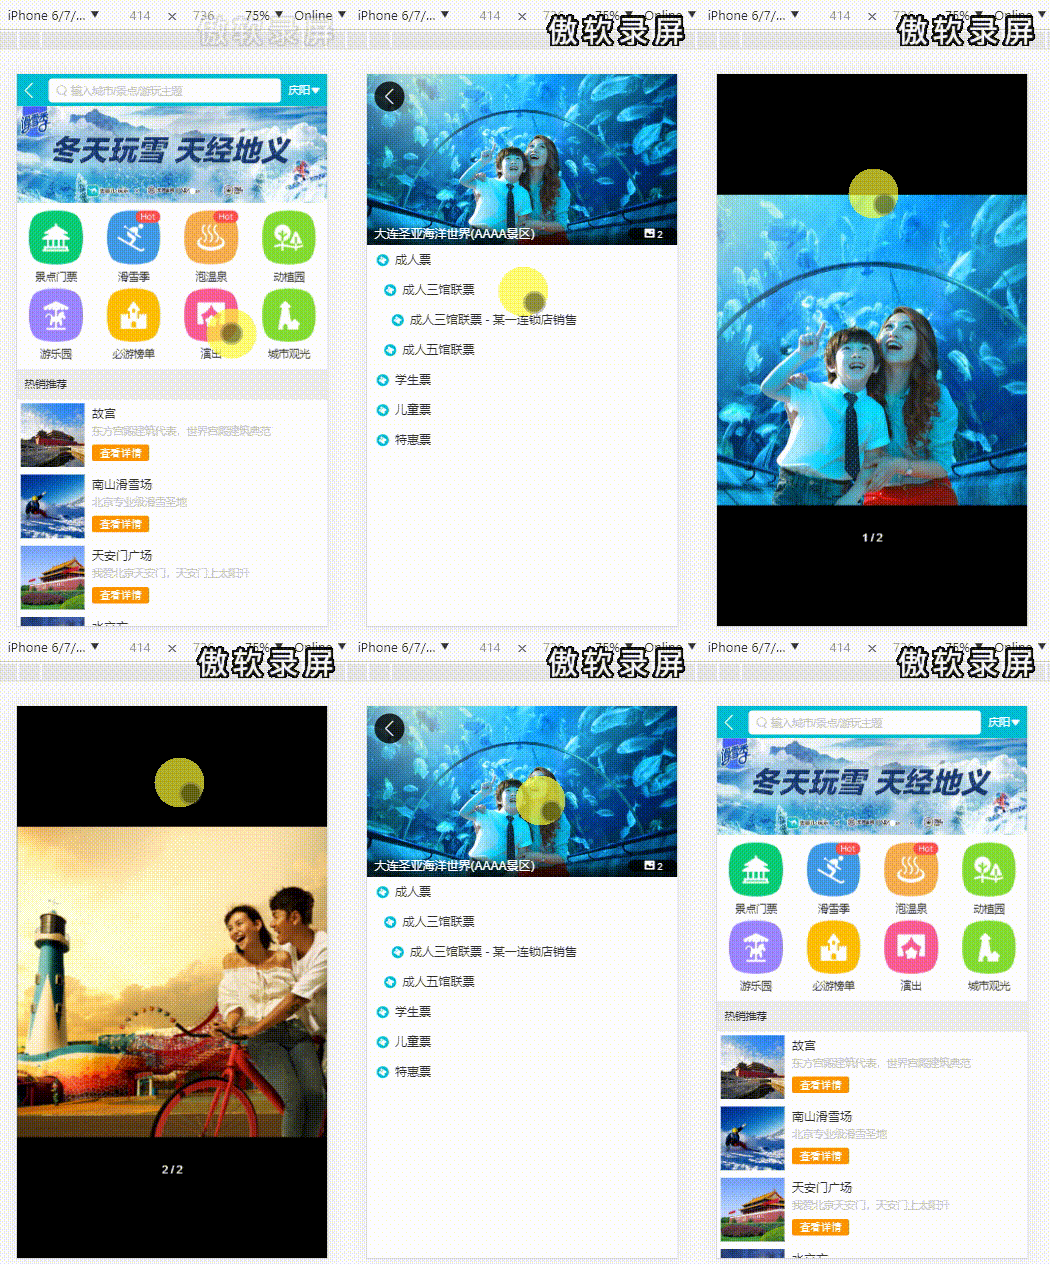
- [x] 景点详情页面:实现公用的画廊组件,以及递归展示的列表组件。
# 1.1 技术栈
Vue 2.5: 用于构建用户界面的渐进式框架
Vuex: 专为 Vue.js 应用程序开发的状态管理模式。
Vue Router: 是 Vue.js 官方的路由管理器。
keep-alive: Vue提供的一个抽象组件,用来对组件进行缓存,从而节省性能
vue-awesome-swiper: 基于 Swiper、适用于 Vue 的轮播组件,支持服务端渲染和单页应用。
stylus: css预处理器
Axios: 一个基于 promise 的 HTTP 库
better-scroll: 是一款重点解决移动端(已支持 PC)各种滚动场景需求的插件。
webpack: 一个现代 JavaScript 应用程序的静态模块打包器(module bundler)。
EsLint: 帮助检查Javascript编程时语法错误,规范代码风格的工具
iconfont: 阿里巴巴图标库
fastclick: 解决移动端点击延迟300ms的问题
# 1.2 项目展示
- 景点门票首页
- 城市列表页面
- 景点详情页面
# 1.3 项目收获
1. 理解整个vue项目的开发流程,上手中型vue项目的开发
- Vue Router 来做多页面的路由
- Vuex 多个组件的数据共享
- 插件swiper实现页面轮播效果
- Axios 来进行 Ajax 数据的获取
2. 移动端页面布局技巧
3. stylus 编写前端的样式
4. 公用组件的拆分
5. 规范的代码编写
# 1.4 项目目录
附上项目目录和仓库地址vue仿去哪儿网webapp (opens new window)
F:.
│  .babelrc
│  .editorconfig
│  .eslintignore
│  .eslintrc.js
│  .gitignore
│  .postcssrc.js
│  index.html
│  package-lock.json
│  package.json
│  README.en.md
│  README.md
│
├─build
│      build.js
│      check-versions.js
│      logo.png
│      utils.js
│      vue-loader.conf.js
│      webpack.base.conf.js
│      webpack.dev.conf.js
│      webpack.prod.conf.js
│
├─config
│      dev.env.js
│      index.js
│      prod.env.js
│
├─src
│  │  App.vue
│  │  main.js
│  │
│  ├─assets
│  │  └─styles
│  │      │  border.css
│  │      │  iconfont.css
│  │      │  mixins.styl
│  │      │  reset.css
│  │      │  varibles.styl
│  │      │
│  │      └─iconfont
│  │              iconfont.eot
│  │              iconfont.svg
│  │              iconfont.ttf
│  │              iconfont.woff
│  │
│  ├─common
│  │  ├─fade
│  │  │      FadeAnimation.vue
│  │  │
│  │  └─gallary
│  │          Gallary.vue
│  │
│  ├─pages
│  │  │  testGit.js
│  │  │
│  │  ├─city
│  │  │  │  City.vue
│  │  │  │
│  │  │  └─components
│  │  │          Alphabet.vue
│  │  │          Header.vue
│  │  │          List.vue
│  │  │          Search.vue
│  │  │
│  │  ├─detail
│  │  │  │  Detail.vue
│  │  │  │
│  │  │  └─components
│  │  │          Banner.vue
│  │  │          Header.vue
│  │  │          List.vue
│  │  │
│  │  └─home
│  │      │  Home.vue
│  │      │
│  │      └─components
│  │              Header.vue
│  │              Icons.vue
│  │              Recommend.vue
│  │              Swiper.vue
│  │              Weekend.vue
│  │
│  ├─router
│  │      index.js
│  │
│  └─store
│          index.js
│          mutations.js
│          state.js
│
└─static
        .gitkeep
2
3
4
5
6
7
8
9
10
11
12
13
14
15
16
17
18
19
20
21
22
23
24
25
26
27
28
29
30
31
32
33
34
35
36
37
38
39
40
41
42
43
44
45
46
47
48
49
50
51
52
53
54
55
56
57
58
59
60
61
62
63
64
65
66
67
68
69
70
71
72
73
74
75
76
77
78
79
80
81
82
83
84
85
86
87
88
89
90
91
92
93
94
95
# 1.5 项目代码初始化
由于做的是webapp,所以需要针对移动端,做相应的准备。
1. meta标签相关设置
index.html
<meta name="viewport" content="width=device-width,initial-scale=1.0,minimum-scale=1.0,maximum-scale=1.0,user-scalable=no">
效果:页面比例始终是1:1,用户通过手指操作缩放是无效的
2. 引入reset.css
目的:重置页面样式
因为在不同移动端、不同浏览器上页面的初始样式是不一样的,引入reset.css为了保证在每个浏览器上展示出的初始效果是一样的
3. 引入border.css
目的:解决移动端1像素边框问题
4. 项目中安装fastclick
npm install fastclick --save
目的:解决移动端300ms延迟问题
# 1.6 页面组件化
路由 router-index.js
import Vue from 'vue'
import Router from 'vue-router'
import Home from '@/pages/home/Home'
import City from '@/pages/city/City'
import Detail from '@/pages/detail/Detail'

Vue.use(Router)

export default new Router({
  routes: [{
    path: '/',
    name: 'Home',
    component: Home
  }, {
    path: '/city',
    name: 'City',
    component: City
  }, {
    path: '/detail/:id',
    name: 'Detail',
    component: Detail
  }],
  scrollBehavior (to, from, savedPosition) {
    return { x: 0, y: 0 }
  }
})
2
3
4
5
6
7
8
9
10
11
12
13
14
15
16
17
18
19
20
21
22
23
24
25
26
27
页面相关目录
pages
├─city
│  │  City.vue
│  │
│  └─components
│          Alphabet.vue
│          Header.vue
│          List.vue
│          Search.vue
│
├─detail
│  │  Detail.vue
│  │
│  └─components
│          Banner.vue
│          Header.vue
│          List.vue
│
└─home
    │  Home.vue
    │
    └─components
            Header.vue
            Icons.vue
            Recommend.vue
            Swiper.vue
            Weekend.vue
common
├─fade
│      FadeAnimation.vue
│
└─gallary
        Gallary.vue
2
3
4
5
6
7
8
9
10
11
12
13
14
15
16
17
18
19
20
21
22
23
24
25
26
27
28
29
30
31
32
33
比如,对于景点门票页面,可以将其拆分成若干个小组件,放到 components 目录下,通过在 Home.vue 容器组件中引用组件,整合出页面
Home.vue部分代码
<template>
  <div>
    <home-header></home-header>
    <home-swiper :list="swiperList"></home-swiper>
    <home-icons :list="iconList"></home-icons>
    <home-recommend :list="recommendList"></home-recommend>
    <home-weekend :list="weekendList"></home-weekend>
  </div>
</template>

<script>
import HomeHeader from './components/Header'
import HomeSwiper from './components/Swiper'
import HomeIcons from './components/Icons'
import HomeRecommend from './components/Recommend'
import HomeWeekend from './components/Weekend'
import axios from 'axios'
import { mapState } from 'vuex'
export default {
  name: 'Home',
  components: {
    HomeHeader,
    HomeSwiper,
    HomeIcons,
    HomeRecommend,
    HomeWeekend
  },
  data () {
    return {
      lastCity: '',
      swiperList: [],
      iconList: [],
      recommendList: [],
      weekendList: []
    }
  }
}
</script>
2
3
4
5
6
7
8
9
10
11
12
13
14
15
16
17
18
19
20
21
22
23
24
25
26
27
28
29
30
31
32
33
34
35
36
37
38
39
40
# 二、项目插件的使用
# 2.1 Ajax 获取 首页数据
vue推荐使用axios,实现跨平台的数据请求
安装 axios
npm install axios --save
在 Home.vue 发送 Ajax 请求是最好的选择,这个组件获取 Ajax 数据之后,可以把数据传给每个子组件
把一些静态的文件放置在static目录下,通过 http://localhost:8080/static/mock/index.json 可以访问到
static
│  .gitkeep
│
└─mock
        city.json
        detail.json
        index.json
2
3
4
5
6
7
Home.vue 部分代码
<template>
  <div>
    <home-header></home-header>
    <home-swiper :list="swiperList"></home-swiper>
    <home-icons :list="iconList"></home-icons>
    <home-recommend :list="recommendList"></home-recommend>
    <home-weekend :list="weekendList"></home-weekend>
  </div>
</template>

<script>
import HomeHeader from './components/Header'
import HomeSwiper from './components/Swiper'
import HomeIcons from './components/Icons'
import HomeRecommend from './components/Recommend'
import HomeWeekend from './components/Weekend'
import axios from 'axios'
import { mapState } from 'vuex'
export default {
  name: 'Home',
  components: {
    HomeHeader,
    HomeSwiper,
    HomeIcons,
    HomeRecommend,
    HomeWeekend
  },
  data () {
    return {
      lastCity: '',
      swiperList: [],
      iconList: [],
      recommendList: [],
      weekendList: []
    }
  },
  computed: {
    ...mapState(['city'])
  },
  methods: {
    getHomeInfo () {
      axios.get('/api/index.json?city=' + this.city)
        .then(this.getHomeInfoSucc)
    },
    getHomeInfoSucc (res) {
      res = res.data
      if (res.ret && res.data) {
        const data = res.data
        this.swiperList = data.swiperList
        this.iconList = data.iconList
        this.recommendList = data.recommendList
        this.weekendList = data.weekendList
      }
    }
  },
  mounted () {
    this.lastCity = this.city
    this.getHomeInfo()
  }
}
</script>

<style>

</style>
2
3
4
5
6
7
8
9
10
11
12
13
14
15
16
17
18
19
20
21
22
23
24
25
26
27
28
29
30
31
32
33
34
35
36
37
38
39
40
41
42
43
44
45
46
47
48
49
50
51
52
53
54
55
56
57
58
59
60
61
62
63
64
65
66
父子组件之间进行通讯
父组件通过 props 传递数据给子组件,子组件通过 emit 发送事件传递数据给父组件
以 List 组件 为例(List.vue 部分代码)
<template>
  <div>
    <div class="title">热销推荐</div>
    <ul>
      <router-link
        tag="li"
        class="item border-bottom"
        v-for="item of list"
        :key="item.id"
        :to="'/detail/' + item.id"
      >
        <img class="item-img" :src="item.imgUrl" />
        <div class="item-info">
          <p class="item-title">{{item.title}}</p>
          <p class="item-desc">{{item.desc}}</p>
          <button class="item-button">查看详情</button>
        </div>
      </router-link>
    </ul>
  </div>
</template>

<script>
export default {
  name: 'HomeRecommend',
  props: {
    list: Array
  }
}
</script>
2
3
4
5
6
7
8
9
10
11
12
13
14
15
16
17
18
19
20
21
22
23
24
25
26
27
28
29
30
31
# 2.2 轮播图
安装 vue-awesome-swiper 插件
npm install vue-awesome-swiper@2.6.7 --save
轮播在多个组件中使用
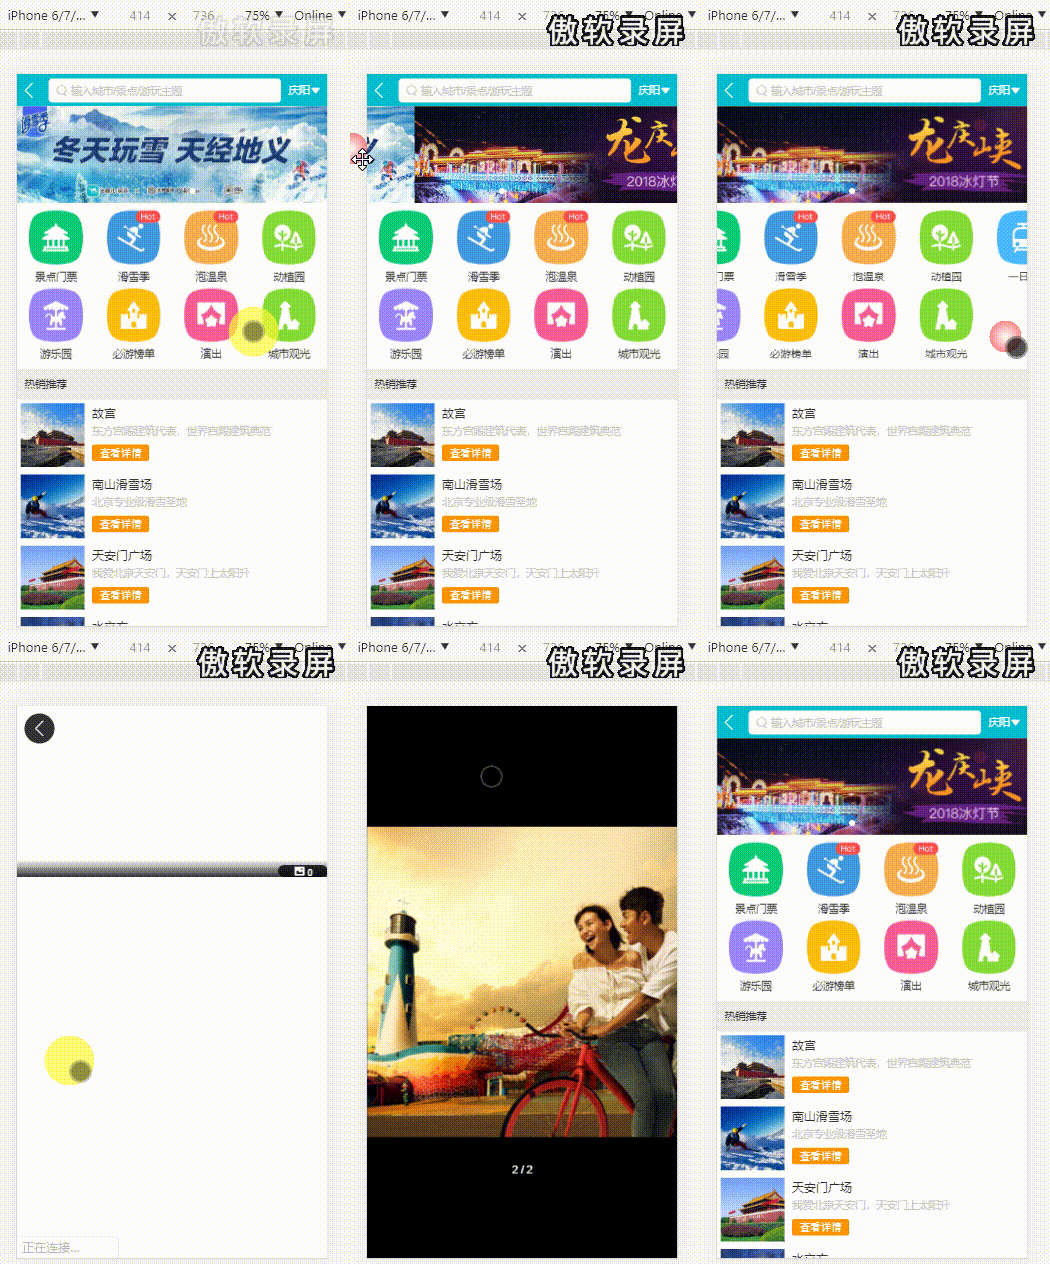
以 home-components-Swiper.vue 为例
<template>
  <div class="wrapper">
    <swiper :options="swiperOption" v-if="showSwiper">
      <swiper-slide v-for="item of list" :key="item.id">
        <img class="swiper-img" :src="item.imgUrl" />
      </swiper-slide>
      <div class="swiper-pagination"  slot="pagination"></div>
    </swiper>
  </div>
</template>

<script>
export default {
  name: 'HomeSwiper',
  props: {
    list: Array
  },
  data () {
    return {
      swiperOption: {
        pagination: '.swiper-pagination',
        loop: true
      }
    }
  },
  computed: {
    showSwiper () {
      return this.list.length
    }
  }
}
</script>
2
3
4
5
6
7
8
9
10
11
12
13
14
15
16
17
18
19
20
21
22
23
24
25
26
27
28
29
30
31
32
33
# 2.3 Better-scroll
安装
npm install better-scroll --save
使用
<div class="wrapper">
  <ul class="content">
    <li>...</li>
    <li>...</li>
    ...
  </ul>
  <!-- you can put some other DOMs here, it won't affect the scrolling
</div>
2
3
4
5
6
7
8
import BScroll from '@better-scroll/core'
let wrapper = document.querySelector('.wrapper')
let scroll = new BScroll(wrapper)
2
3
# 2.4 使用vuex实现数据共享
安装vuex
npm install vuex --save
希望在 城市列表页面 点击城市,首页右上角城市可以 进行相应的改变。
具体描述为:
项目中是为了实现城市选择列表页面和首页的数据传递,并且没有公用的组件,city/components/List.vue 、home/components/Header.vue、Home.vue组件,都需要获取到数据。
因为这个项目没有需要进行异步的操作,也不需要对数据进行额外的处理,所以项目中只用到了 state 和 mutations。在 state 中存储了 city 数据,然后在 mutation 里定义事件类型和函数 changeCity
store
    index.js
    mutations.js
    state.js
2
3
4
state.js
let defaultCity = '上海'
try {
  if (localStorage.city) {
    defaultCity = localStorage.city
  }
} catch (e) {}

export default {
  city: defaultCity
}
2
3
4
5
6
7
8
9
10
11
mutations.js
export default {
  changeCity (state, city) {
    state.city = city
    try {
      localStorage.city = city
    } catch (e) {}
  }
}
2
3
4
5
6
7
8
index.js
import Vue from 'vue'
import Vuex from 'vuex'
import state from './state'
import mutations from './mutations'

Vue.use(Vuex)

export default new Vuex.Store({
  state,
  mutations
})
2
3
4
5
6
7
8
9
10
11
12
Home.vue 组件,在计算属性中,this.$store.state.xxx,在这个项目中是 this.$store.state.city可以获取到 state 数据。当然,为了使代码更加简洁,用 mapState 将 this.xxx 映射为 this.$store.state.xxx。
在 List.vue 中,通过 commit 来触发 mutations 里面的方法进行数据的修改。同样,为了使代码更加简洁,引入 mapMutations 将 this.changeCity(city) 映射为 this.$store.commit('changeCity', city)。
【city/List.vue 具体是】
import { mapState, mapMutations } from 'vuex'

computed: {
    ...mapState({
      currentCity: 'city'
    })
  },
  methods: {
    handleCityClick (city) {
      // this.$store.commit('changeCity', city)
      this.changeCity(city)
      this.$router.push('/')
    },
    ...mapMutations(['changeCity'])
  }
2
3
4
5
6
7
8
9
10
11
12
13
14
15
这样就实现了这几个组件的数据共享。
# 三、项目难点
# 3.1 兄弟组件间联动
实现功能:点击城市列表页面右侧的字母,列表选项会滚动到对应的字母区域。【gif展示】
兄弟组件的传值,可以通过 bus 总线的形式来传值。但是因为我们现在这个非父子组件比较简单,可以让 Alphabet.vue 组件将值传递给父组件 City.vue 组件,然后 City.vue 组件再将值转发给 List.vue 组件,这样就实现了兄弟组件的传值。【子组件给父组件,父组件再转给另一个子组件】。这样,在 Alphabet.vue 中点击右侧字母,会获取到对应的字母。

Alphabet.vue
在循环的元素上加一个点击事件,例如 handleLetterClick,然后在 methods 中写这个事件方法:
<template>
  <ul class="list">
    <li
      class="item"
      v-for="item of letters"
      :key="item"
      :ref="item"
      @click="handleLetterClick"
    >
      {{item}}
    </li>
  </ul>
</template>

<script>
methods: {
    handleLetterClick(e) {
        this.$emit("change", e.target.innerHTML);
    }
}
</script>
2
3
4
5
6
7
8
9
10
11
12
13
14
15
16
17
18
19
20
21
接下来,将父组件接收到的这个数据转发给子组件 List.vue,父组件是通过属性向子组件传值的。
首先在父组件 City.vue 里的 data 中定义一个 letter,默认值是空,在 handleLetterClick 方法中,当接受到外部传来的 letter 的时候,让 this.letter = letter。
City.vue
<template>
  <div>
    <city-header></city-header>
    <city-search :cities="cities"></city-search>
    <city-list
      :cities="cities"
      :hot="hotCities"
      :letter="letter"
    ></city-list>
    <city-alphabet
      :cities="cities"
      @change="handleLetterChange"
    ></city-alphabet>
  </div>
</template>

<script>
data() {
    return {
        hotCities: [],
        cities: {},
        letter: ""
    };
},
methods: {
    handleAlpChange(letter) {
        this.letter = letter;
    }
}
</script>
2
3
4
5
6
7
8
9
10
11
12
13
14
15
16
17
18
19
20
21
22
23
24
25
26
27
28
29
30
最后只需要把 letter 传递给子组件 List.vue 就可以了,在 City.vue 组件的模板 city-list 中通过 :letter="letter" 向子组件 List 传值,在 props 中接收这个 letter,并且验证类型为 String 类型。
List.vue
props: {
    hot: Array,
    cities: Object,
    letter: String
  }
2
3
4
5
这样就实现了兄弟组件的传值。
【项目难点】
接下来要做的是,当 List.vue 发现 letter 有改变的时候,就需要让组件显示的列表项跟 letter 相同的首字母的列表项要显示出来,怎么做呢?
这个时候就要借助一个侦听器,监听letter的变化;
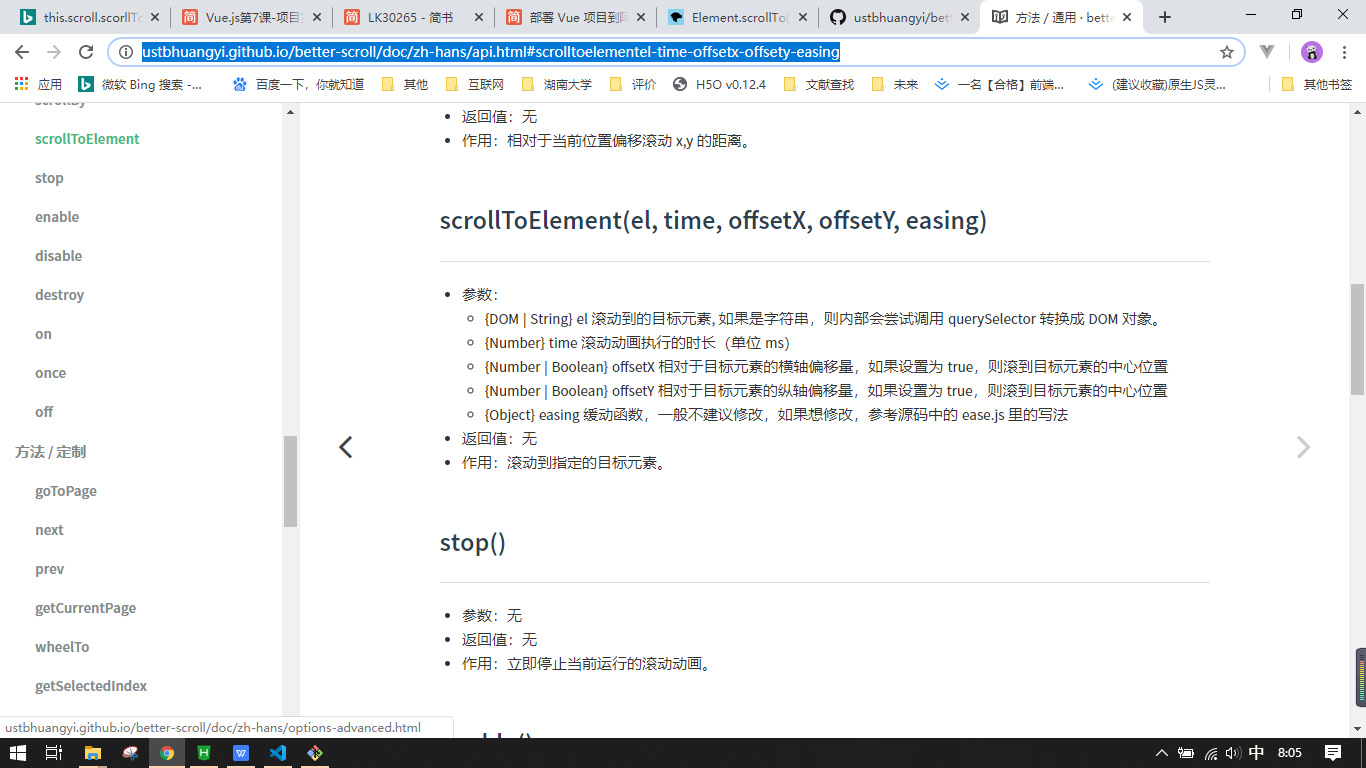
better-scroll 给提供了这样一个接口,scroll.scorllToElement,如果 letter 不为空的时候,就调用 this.scroll.scrollToElement() 这个方法,可以让滚动区自动滚到某一个元素上,那么怎么传这个元素呢?在循环城市这一块中,给循环项加一个 ref 引用来获取当前 Dom 元素,等于 key,然后回到侦听器的 letter 中,定义一个 element,它就等于通过 ref 获取到的元素:
List.vue
watch: {
    letter() {
        if (this.letter) {
            const element = this.$refs[this.letter][0];
            this.scroll.scrollToElement(element);
        }
    }
},
2
3
4
5
6
7
8
这个时候就可以通过字母获取到对应的区域,然后把 element 传入 scrollToElement 里,注意,上边代码最后加了一个 [0],这是因为如果不加,通过 ref 或的内容就是一个数组,这个数组里的第一个元素才是真正的 DOM 元素,这个时候,点击右侧字母表,就可以跳到对应的字母下的城市列表了。
点击跳转的功能实现啦
# 3.2 search组件
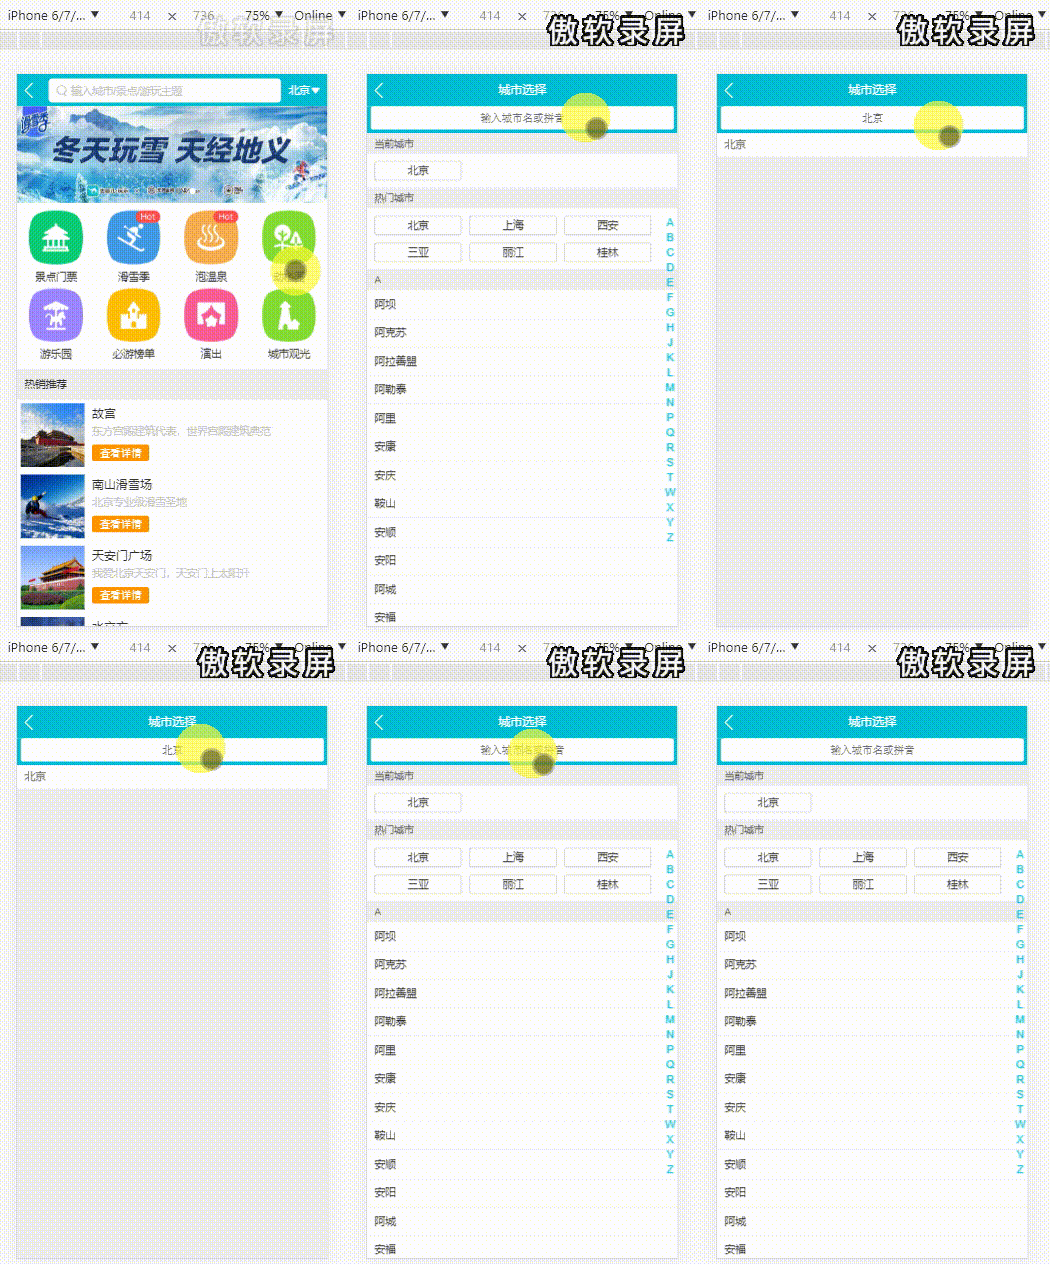
功能:进入到城市选择页面的时候,当 focus 到搜索框,输入城市名或拼音能够把搜索的结果显示出来。
<template>
  <div>
    <div class="search">
      <input v-model="keyword" class="search-input" type="text" placeholder="输入城市名或拼音" />
    </div>
    <div
      class="search-content"
      ref="search"
      v-show="keyword"
    >
      <ul>
        <li
          class="search-item border-bottom"
          v-for="item of list"
          :key="item.id"
          @click="handleCityClick(item.name)"
        >
          {{item.name}}
        </li>
        <li class="search-item border-bottom" v-show="hasNoData">
          没有找到匹配数据
        </li>
      </ul>
    </div>
  </div>
</template>

<script>
import Bscroll from 'better-scroll'
import { mapMutations } from 'vuex'
export default {
  name: 'CitySearch',
  props: {
    cities: Object
  },
  data () {
    return {
      keyword: '',
      list: [],
      timer: null
    }
  },
  computed: {
    hasNoData () {
      return !this.list.length
    }
  },
  watch: {
    keyword () {
      if (this.timer) {
        clearTimeout(this.timer)
      }
      if (!this.keyword) {
        this.list = []
        return
      }
      this.timer = setTimeout(() => {
        const result = []
        for (let i in this.cities) {
          this.cities[i].forEach((value) => {
            if (value.spell.indexOf(this.keyword) > -1 || value.name.indexOf(this.keyword) > -1) {
              result.push(value)
            }
          })
        }
        this.list = result
      }, 100)
    }
  },
  methods: {
    handleCityClick (city) {
      this.changeCity(city)
      this.$router.push('/')
    },
    ...mapMutations(['changeCity'])
  },
  mounted () {
    this.scroll = new Bscroll(this.$refs.search)
  }
}
</script>
2
3
4
5
6
7
8
9
10
11
12
13
14
15
16
17
18
19
20
21
22
23
24
25
26
27
28
29
30
31
32
33
34
35
36
37
38
39
40
41
42
43
44
45
46
47
48
49
50
51
52
53
54
55
56
57
58
59
60
61
62
63
64
65
66
67
68
69
70
71
72
73
74
75
76
77
78
79
80
81
【性能优化---防抖】
写一个侦听器 watch,在里边监听 keyword 的改变,考虑到性能优化,使用防抖的方式来实现,先在 data 中定义一个 timer 定时器,默认值为 null,然后在监听 keyword 的方法中,判断,当 timer 为 null 时,清除这个定时器。下面写这个定时器的方法,当延时 100ms 的时候,箭头函数会被执行。
# 3.3 递归组件
递归组件的意思就是在组件自身调用组件自身。
数据 detail.json
{
  "ret": true,
  "data": {
    "sightName": "大连圣亚海洋世界(AAAA景区)",
    "bannerImg": "http://img1.qunarzz.com/sight/p0/201404/23/04b92c99462687fa1ba45c1b5ba4ad77.jpg_600x330_bf9c4904.jpg",
    "gallaryImgs": ["http://img1.qunarzz.com/sight/p0/201404/23/04b92c99462687fa1ba45c1b5ba4ad77.jpg_800x800_70debc93.jpg", "http://img1.qunarzz.com/sight/p0/1709/76/7691528bc7d7ad3ca3.img.png_800x800_9ef05ee7.png"],
    "categoryList": [{
        "title": "成人票",
        "children": [{
          "title": "成人三馆联票",
          "children": [{
            "title": "成人三馆联票 - 某一连锁店销售"
          }]
        },{
          "title": "成人五馆联票"
        }]
      }, {
        "title": "学生票"
      }, {
        "title": "儿童票"
      }, {
        "title": "特惠票"
      }]
  }
}
2
3
4
5
6
7
8
9
10
11
12
13
14
15
16
17
18
19
20
21
22
23
24
25
26
list.vue
<template>
  <div>
    <div
      class="item"
      v-for="(item, index) of list"
      :key="index"
    >
      <div class="item-title border-bottom">
        <span class="item-title-icon"></span>
        {{item.title}}
      </div>
      <div v-if="item.children" class="item-chilren">
        <detail-list :list="item.children"></detail-list>
      </div>
    </div>
  </div>
</template>

<script>
export default {
  name: 'DetailList',
  props: {
    list: Array
  }
}
</script>

<style lang="stylus" scoped>
  .item-title-icon
    position: relative
    left: .06rem
    top: .06rem
    display: inline-block
    width: .36rem
    height: .36rem
    background: url(http://s.qunarzz.com/piao/image/touch/sight/detail.png) 0 -.45rem no-repeat
    margin-right: .1rem
    background-size: .4rem 3rem
  .item-title
    line-height: .8rem
    font-size: .32rem
    padding: 0 .2rem
  .item-chilren
    padding: 0 .2rem
</style>
2
3
4
5
6
7
8
9
10
11
12
13
14
15
16
17
18
19
20
21
22
23
24
25
26
27
28
29
30
31
32
33
34
35
36
37
38
39
40
41
42
43
44
45
46
上面代码中,在
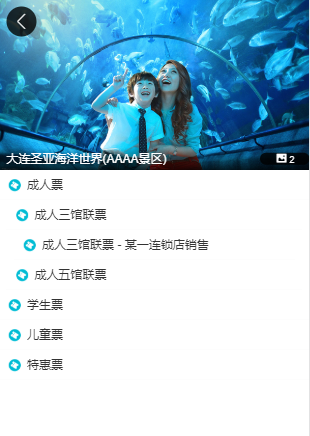
list-children这个元素下,先做了一个判断,当item.children下有值的时候,调用一下自身,也就是 detail-list 这个组件,这个组件也是通过属性的形式,传一个 list,因为在 list.vue 中已经通过 props 接收到 list 了,而且外层已经循环过 list 了,现在要获取 list 下的 children 中的数据,所以直接让这个 list 属性等于item.children就可以了。因为数据存在层级关系,可以通过添加样式呈现出来,效果如下图:
# 四、项目中遇到的问题及解决方案
这部分内容并不是所有在项目中遇到的问题和解决方法,因为上文中也有相应的描述,这部分内容是对上文的补充。
# 4.1 localStorage
刚开始在实现首页右上角城市定位显示的时候,src 目录下新建了一个 store 目录,存储了 Vuex 中的默认数据,city 直接设置成了“北京”,但是其实这样去写,是有问题的,点击城市,会改变这个 city,但是当页面刷新了,就又变回了北京。
考虑到在真实的项目中,如果你这次选中了一个城市,下次再打开这个网页的时候,上次选的城市还应该在的,怎么解决这个问题呢?
这时可以借助 HTML5 中提供了一个新的 api,叫做 localStorage localStorage,它可以实现本地存储,在这里也就是实现保存城市的功能。
store/index.js中,这样去写代码,当用户尝试去改变城市的时候,我不但把 state 中的 city 改了,同时还去存一个 localStorage,直接写 localStorage.city = city 就可以了。然后让 stare 中 city 的默认值是 localStorage.city || "北京",就可以了。也就是 city 的值我默认先去 localStorage 中取,如果取不到,才用默认的 “北京”。
store/index.js
import Vue from "vue";
import Vuex from "vuex";
Vue.use(Vuex);
export default new Vuex.Store({
    state: {
        city: localStorage.city || "北京"
    },
    mutations: {
        changeCity(state, city) {
            state.city = city;
            localStorage.city = city;
        }
    }
})
2
3
4
5
6
7
8
9
10
11
12
13
14
这个时候打开页面,当用户选择一个城市,然后刷新页面,可以看到上次选择的城市还在。但是当使用 localStorage 的时候,建议在外层包裹一个 try{ }catch(e){ },因为在某些浏览器,如果用户关闭了本地存储这样的功能,或者使用隐身模式,使用 localStorage 可能导致浏览器直接抛出异常,代码就运行不了了,为了避免这种问题,建议在外层加一个 try{ }catch(e){ },怎么加呢?
先定义一个默认的 defaultCity 等于“北京”,然后写一个 try{ }catch(e){ },这样写:如果有 localStorage.city,default.city 就等于 localStorage.city,下边 state 中的 city 就可以等于 defaultCity 了,同样在 mutations 的 changeCity 中也要写一个 try{ }catch(e):
store/index.js
import Vue from "vue";
import Vuex from "vuex";
Vue.use(Vuex);

let defaultCity = "北京"
try {
    if (localStorage.city) {
        defaultCity = localStorage.city;
    }
} catch (e) { }

export default new Vuex.Store({
    state: {
        city: defaultCity
    },
    mutations: {
        changeCity(state, city) {
            state.city = city;
            try {
                localStorage.city = city;
            } catch (e) { }
        }
    }
})
2
3
4
5
6
7
8
9
10
11
12
13
14
15
16
17
18
19
20
21
22
23
24
现在我们看到 store/index.js 这个文件慢慢的变得复杂起来了,实际上,在真正的项目开发和之中,会做进一步的拆分,也就是把这个文件拆分为 State、Actions、Mutations,在 store 中创建一个文件叫 state.js(只存储公用数据),然后把设置默认数据的这块代码放进去,并通过 export 导出,内容就是在 index.js 中定义的 state 对象里的内容:
let defaultCity = "北京"
try {
    if (localStorage.city) {
        defaultCity = localStorage.city;
    }
} catch (e) { }
export default {
    city: defaultCity
}
2
3
4
5
6
7
8
9
接下来,只需要在 index.js 中 import state 就可以了:
import Vue from "vue";
import Vuex from "vuex";
import state from "./state";
Vue.use(Vuex);

export default new Vuex.Store({
    state: state,
    mutations: {
        changeCity(state, city) {
            state.city = city;
            try {
                localStorage.city = city;
            } catch (e) { }
        }
    }
})
2
3
4
5
6
7
8
9
10
11
12
13
14
15
16
接着,在 store 目录下创建一个文件,叫做 mutations.js,然后把 index.js 中的 mutations 对象里的代码剪切进去:
export default {
    changeCity(state, city) {
        state.city = city;
        try {
            localStorage.city = city;
        } catch (e) { }
    }
}
2
3
4
5
6
7
8
最终 index.js 就变成了这样:
import Vue from "vue";
import Vuex from "vuex";
import state from "./state";
import mutations from "./mutations";
Vue.use(Vuex);

export default new Vuex.Store({
    state: state,
    mutations: mutations
})
2
3
4
5
6
7
8
9
10
这样,我们就将 vuex 的代码拆分成了 State、Actions、Mutations 这几个部分,未来它的维护性也会得到比较大的提高。
# 4.2 keep-alive
使用 keep-alive 优化网页性能
当写完城市列表响应代码,启动服务,打开页面,这样看不存在什么问题,基本的一些业务逻辑都已经实现了,但是在控制台中打开 Network 网络这个选项,选择 XHR,当初次进入首页的时候,请求了一个 index.json 的文件,然后切换到列表页,又请求了一个 city.json,然后再回到首页,index.json 又请求了一次,再次去列表页,city.json 又请求了一次,也就是,每一次路由发生变化的时候,Ajax 都会重新的被发送。
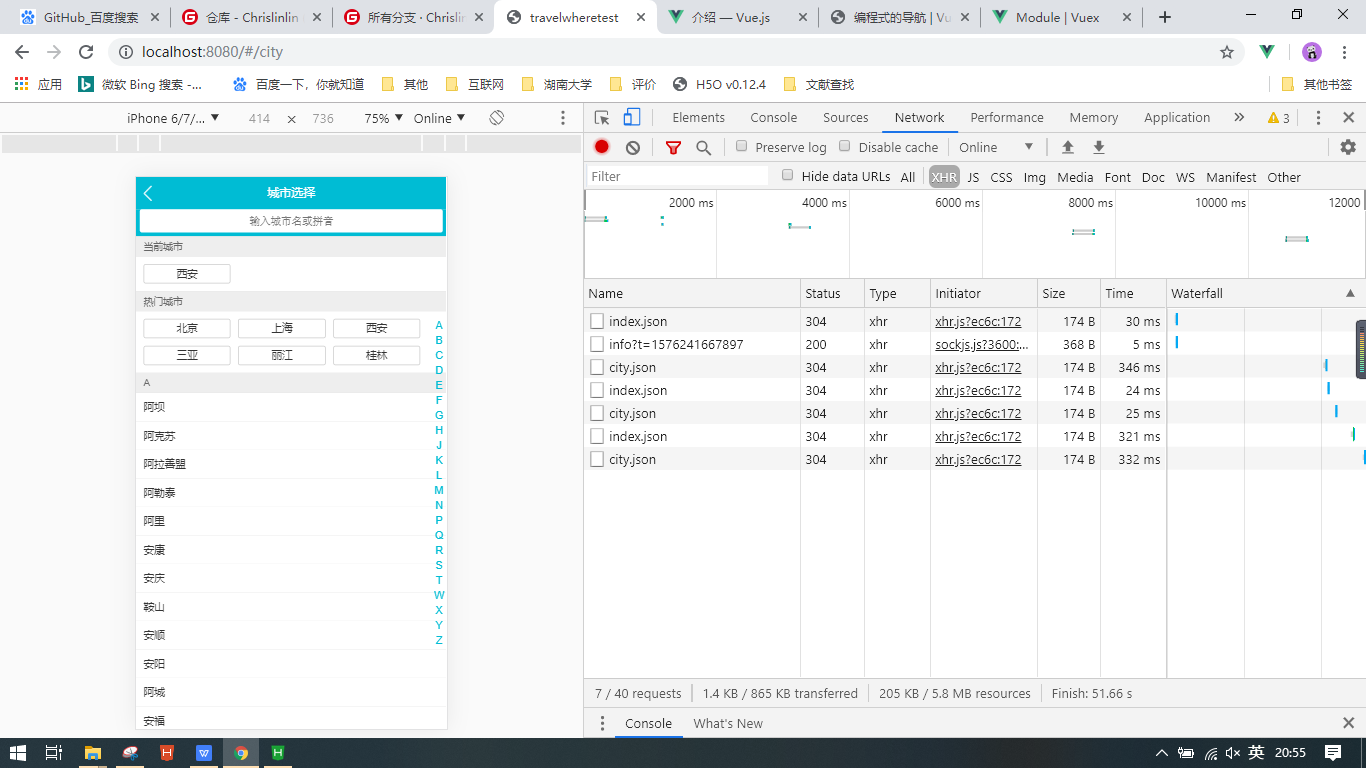
思考是什么原因导致这样的问题呢,打开 Home.vue 首页这个组件,每一次打开这个首页的时候,都会被重新的渲染,所以 mounted 这个钩子就会被重新的执行,那么这个 Ajax 数据就会被重新获取,那么这么能让它只获取一次呢?
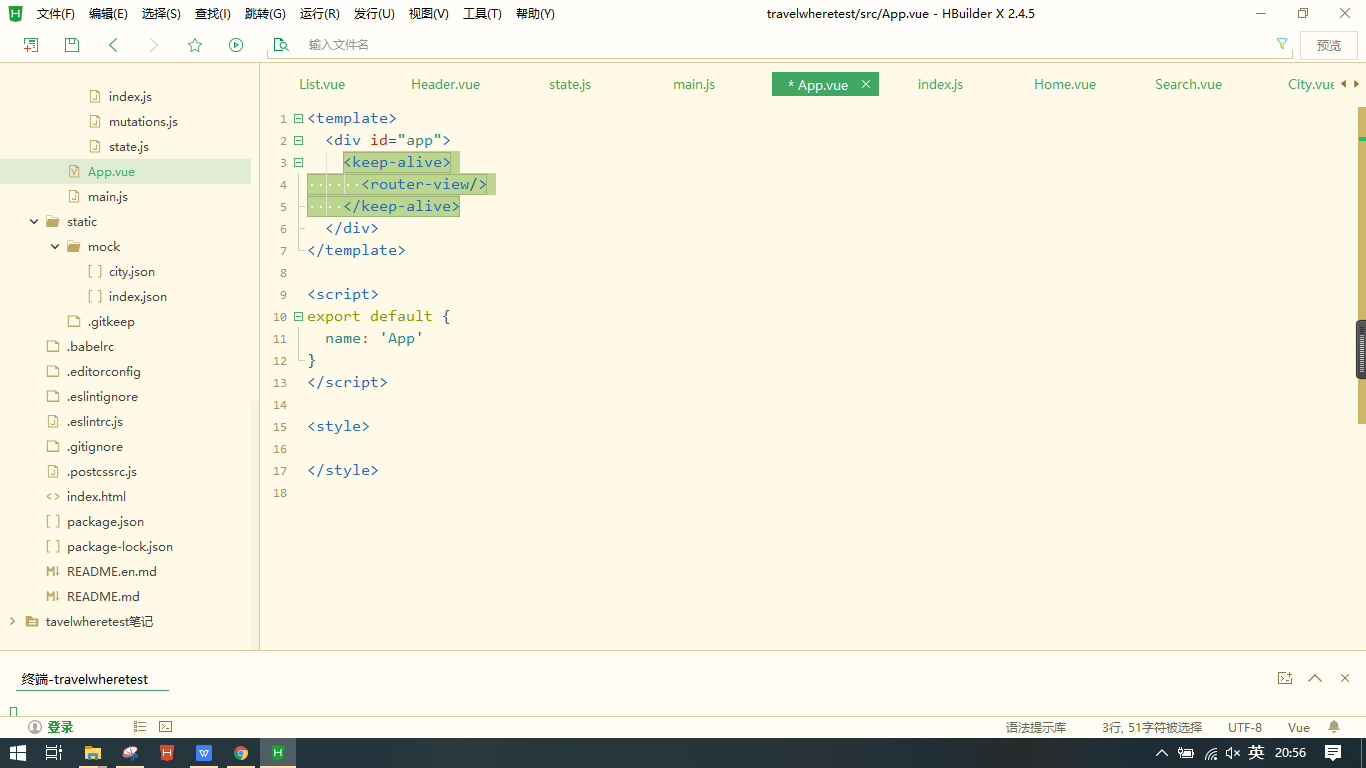
打开 main.js,可以看到入口组件是 App 这个组件,再打开 App.vue,router-view 显示的是当前地址所对应的内容,我们可以在外层包裹一个 keep-alive 的一个标签,他是 Vue 自带的一个标签,他的意思就是我的路由的内容被加载一次后,我就把路由中的内容放到内存之中,下一次再进入这个路由的时候,不需要重新渲染这个组件,去重新执行钩子函数,只要去内存里把以前的内容拿出来就可以。
这个时候,回到页面上,再打开 Network,进入到列表页,选择城市再返回首页,就不会再去加载 index.json 了,同样再进入列表页,也不会再去加载 city.json 了,他直接会从内存中调数据,而不会重新去法 Ajax 请求了。
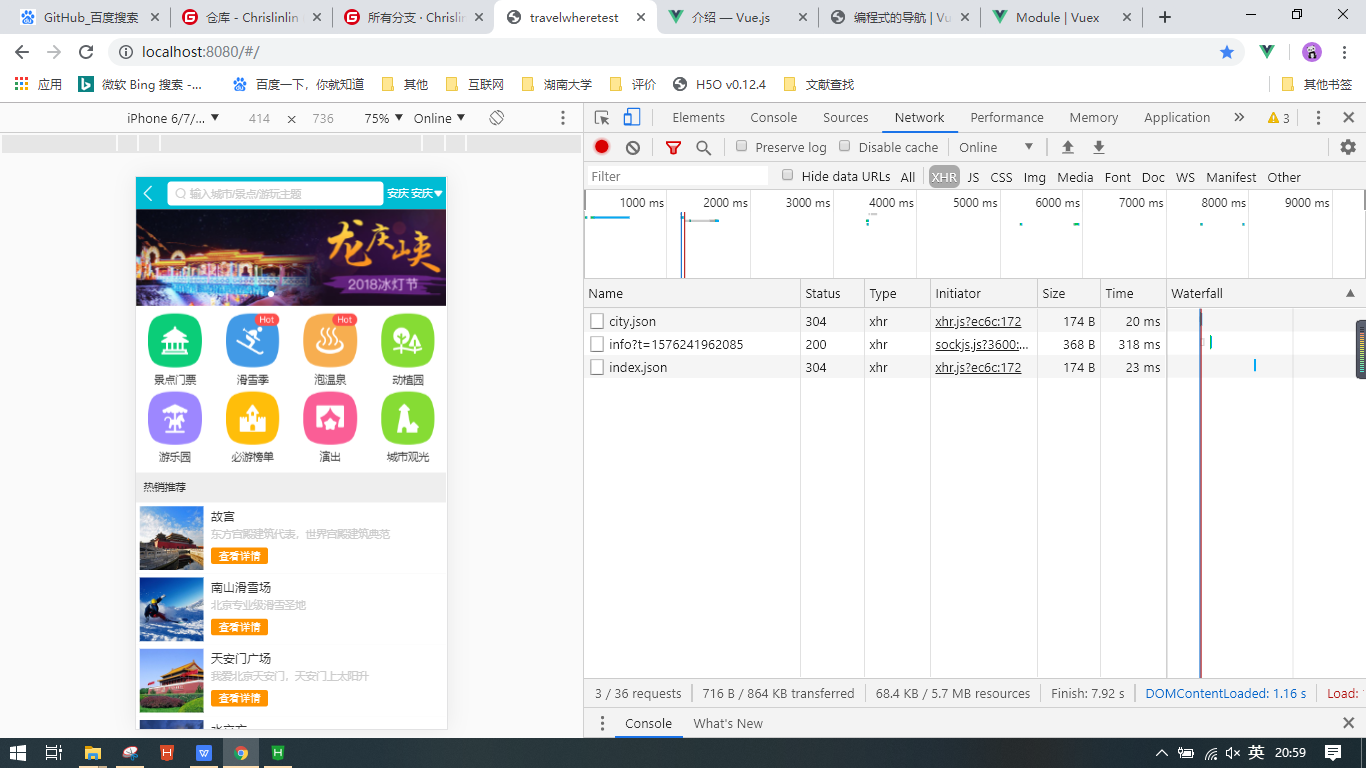
这样还是存在逻辑上的问题的,当我在“北京”的时候,首页显示的是“北京”的内容,当切换为“上海”时,首页就应该显示“上海”的内容,所以城市发生改变的时候,首页还需要重新发一次 Ajax 请求,来获取不同城市的数据信息,我们对这一块做一个调整。
打开 Home.vue 组件,改一下 axios 请求地址这里,在他的后面带一个参数,让他等于 Vuex 中存的当前的城市,所以还需要在 Home.vue 组件中引用 Vuex,import { mapState } from "vuex",然后再加一个计算属性:
computed:{
    ...mapState(['city'])
}
2
3
获取到城市对应的内容,然后就可以在发 Ajax 的时候,把 city 放在请求的参数里面:
axios.get("/api/index.json?city=" + this.city)
.then(this.getHomeInfoSucc);
2
这个时候,我们打开页面,可以看到请求参数里已经携带了当前的城市:
但是,例如当你切换了城市“桂林”,回到首页,并没有重新发 Ajax 请求,虽然上面的城市变成了“桂林”,但是底下的内容还是“北京”的内容,我们希望底下的内容跟着变,该怎么做呢?
当我们在 App.vue 中用了 keep-alive 的时候,这块的内容已经被缓存起来了,他直接取得是缓存里的数据,那如何去改变缓存里的数据呢?当你使用 keep-alive 的时候,组件中会多出一个生命周期函数 activted,
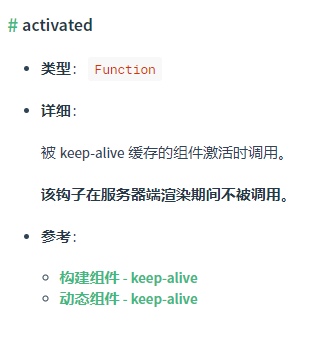
可以在 mounted 和 activated 两个生命周期函数下打印一些内容,到浏览器上看一下他俩的执行:
mounted() {
    console.log("mounted");
    this.getHomeInfo();
},
activated(){
    console.log("activted");
}
2
3
4
5
6
7
打开页面,可以看到,mounted 和 activated 都会执行,当切换了城市,再回到首页的时候,组件的 mounted 就不会执行了,就只有 activated 会被执行,那么我们借助 activated 这个生命周期函数就可以实现我们想要的功能了。
首先在页面被挂载的时候,也就是 mounted 中一定会去发一个 Ajax 请求,当页面重新被显示的时候,activated 一定会被重新的执行,那么我们就可以在页面每次重新显示的时候,可以判断当前页面上的城市和上次页面上显示的城市是否是相同的,如果不相同的,就再发一次 Ajax 请求。
先在 data 中设置一个数据 lastCity,默认值是空,接着当页面被挂载的时候,让它等于 this.city,对上一次的城市做一个保存:
mounted() {
    this.lastCity = this.city
    this.getHomeInfo();
}
2
3
4
当页面被重新激活的时候,我们在 activted 中这样写:
activated() {
    if(this.lastCity != this.city){
        this.lastCity = this.city
        this.getHomeInfo();
    }
}
2
3
4
5
6
如果上一次的城市 lastCity 不等于当前城市的时候,就重新发一个 Ajax 请求,直接调用上面 getHomeInfo 方法就可以了。当上次的 city 和这次的 city 不一样时,还需要让他等于这次的 city。回到页面上,可以看到当切换的城市和上次的城市一样时,Ajax 就不会请求 city.json 了,当不一样时,才会去请求 city.json。
回到代码里面,通过 activted 这样一个 keep-alive 新增的生命周期函数,结合 lastCity 这样一个临时缓存变量,就实现了首页代码性能优化的调整。
说明,本项目来源于Dell Vue2.5开发去哪儿网App从零基础入门到实战项目 (opens new window)
本文的写作灵感与思路一部分来源于神三元的react hooks+redux+immutable.js打造网易云音乐精美webApp (opens new window)