# 1.学习指南
- 官网学习--掌握思想和 API 的使用
- 实战--具体使用,巩固所学
- 较复杂项目--真正应用于实践中
- 源码学习
在这几个过程中都可以在网上查找优秀的博客文章辅助理解学习。
最后可以通过 5W1H 来检验自己对技术的掌握程度。
# 2.面试官问:你使用过 Vuex 吗?
对于 vuex 相关的面试题,我们可以从vuex 是什么?为什么要使用 vuex ? 适用于哪些场景?如何使用 vuex ? 它的实现原理是什么样的?这几个方面准备。以下是简洁描述,具体的需要参照 vuex 的官网进行学习。
# 2.1 vuex 是什么?
根据官网上的描述,vuex是一个专为vue.js应用程序开发的状态管理模式。 它采用集中式存储/管理 应用的所有组件的状态,并以相应的规则保证 状态以一种可预测的方式发生变化。
# 2.2 为什么使用 vuex?
当应用遇到多个组件共享状态的时候,可能会出现,多个视图依赖于同一状态,来自不用视图的行为需要变更同一状态;像这种比较复杂的数据传递问题,就可以使用 vuex 帮助我们进行开发。
# 2.3 如何使用 vuex?
- vuex 把组件的共享状态抽取出来,放到store(仓库)里边;它的状态存储是响应式的。
- 当 Vue 组件从 store 中读取状态的时候,若 store 中的状态发生变化,那么相应的组件也会相应地得到高效更新。
- 不能直接改变 store 中的状态。改变 store 中的状态的唯一途径就是显式地提交 (commit) mutation。这样我们可以方便地跟踪每一个状态的变化。
# vuex有哪几种属性?
有五种,分别是 State、 Getter、Mutation 、Action、 Module
- state---state为单一状态树,在state中需要定义我们所需要管理的数组、对象、字符串等等,只有在这里定义了,在vue.js的组件中才能获取你定义的这个对象的状态。
- getter---getter有点类似vue.js的计算属性,当我们需要从store的state中派生出一些状态,那么我们就需要使用getter,getter会接收state作为第一个参数,而且getter的返回值会根据它的依赖被缓存起来,只有getter中的依赖值(state中的某个需要派生状态的值)发生改变的时候才会被重新计算。
- mutation---更改store中state状态的唯一方法就是提交mutation,就很类似事件。每个mutation都有一个字符串类型的事件类型和一个回调函数,我们需要改变state的值就要在回调函数中改变。我们要执行这个回调函数,那么我们需要执行一个相应的调用方法:store.commit。
- action---action可以提交mutation,在action中可以执行store.commit,而且action中可以有任何的异步操作。在页面中如果我们要用这个action,则需要执行store.dispatch
- module---module其实只是解决了当state中很复杂臃肿的时候,module可以将store分割成模块,每个模块中拥有自己的state、mutation、action和getter。
# vuex的数据传递流程:
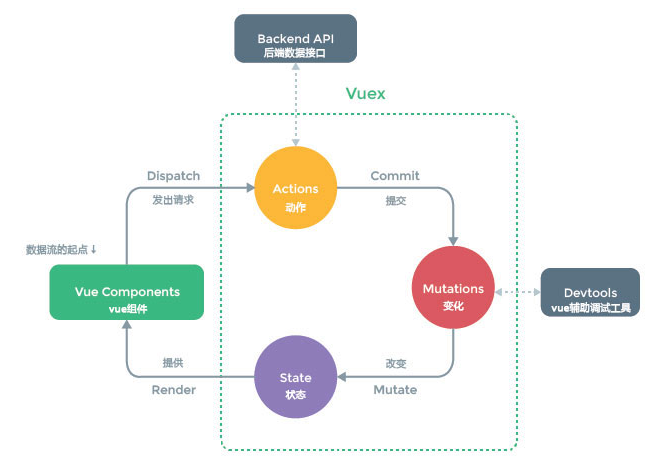
mutations 里面的每个函数都会有一个 state 参数,这样就可以在 mutations 里面进行 state 的数据修改,当数据修改完毕后,会传导给页面。页面的数据也会发生改变。
当组件进行数据修改的时候我们需要调用 dispatch 来触发 actions 里面的方法。actions 里面的每个方法中都会有一个 commit 方法,当方法执行的时候会通过 commit 来触发 mutations 里面的方法进行数据的修改。
# 3.简单项目
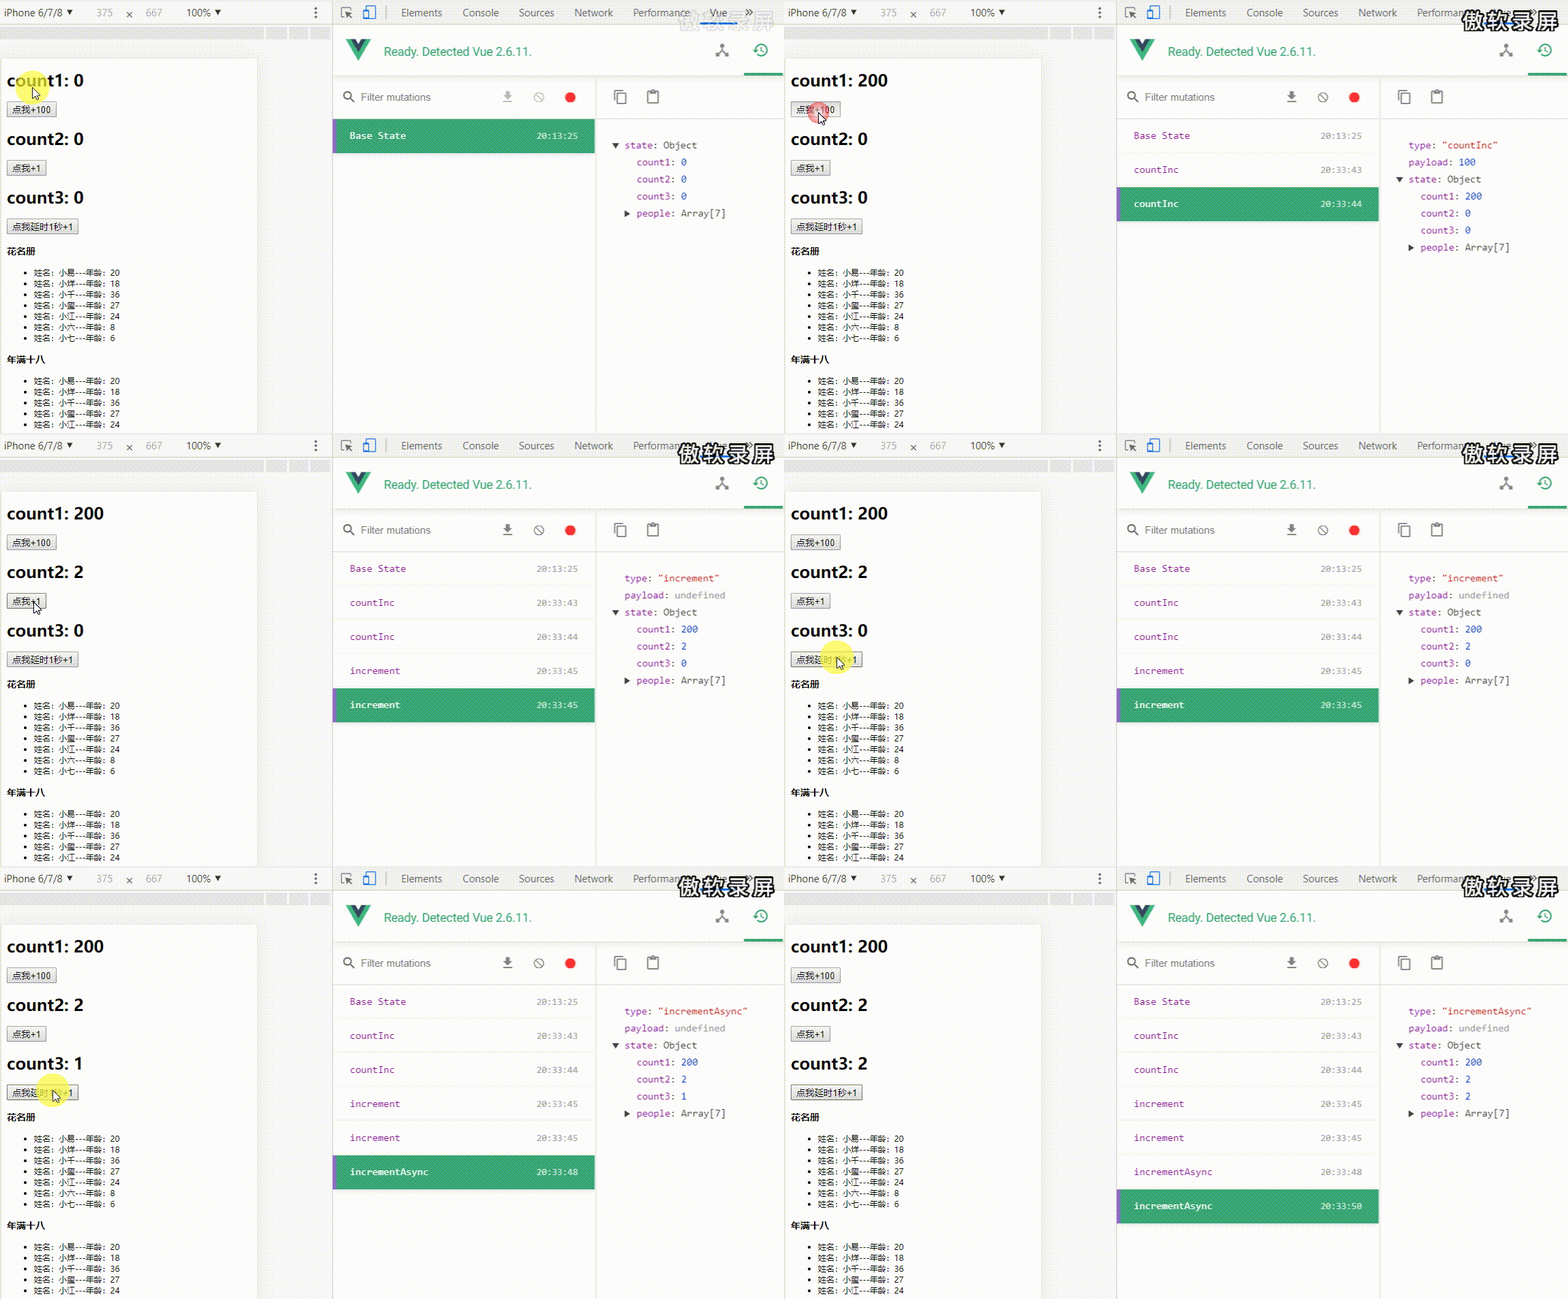
通过 vuex 基础知识的学习,根据官网的示例,我们可以进行实战训练。先来做一个简单的 demo。实现的效果很简单,直接看图。
首先创建一个vue项目
vue init webpack projectName
安装vuex
npm install vuex --save
在 src 下创建一个 store 目录, 新建以下文件:
- index.js
- state.js
- getters.js
- mutations.js
- actions.js
在 main.js 中引入和使用
import Vue from 'vue'
import App from './App'
import router from './router'
import Vuex from "vuex"
import store from "./store"

Vue.config.productionTip = false

Vue.use(Vuex)

/* eslint-disable no-new */
new Vue({
  el: '#app',
  router,
  store,
  components: { App },
  template: '<App/>'
})
2
3
4
5
6
7
8
9
10
11
12
13
14
15
16
17
18
在 index.js 中
import Vue from 'vue'
import Vuex from 'vuex'
import state from './state'
import getters from './getters'
import mutations from './mutations'
import actions from './actions'

Vue.use(Vuex)

export default new Vuex.Store({
  state,
  getters,
  mutations,
  actions
})
2
3
4
5
6
7
8
9
10
11
12
13
14
15
首先实现第一个,count1
在state.js中
export default {
  count1: 0
}
2
3
在 mutations.js 中
export default {
  countInc(state, v) {
    state.count1 = state.count1 + v
  }
}
2
3
4
5
在 App.vue 中
<template>
  <div id="app">
    <h1>count1: {{count1}}</h1>
    <button @click="countIncrease">点我+100</button>
  </div>
</template>

<script>
  export default {
    name: 'App',
    computed: {
      count1() {
        return this.$store.state.count1;
      }
    },
    methods: {
      countIncrease() {
        this.$store.commit("countInc", 100);
      }
	}
  }
</script>

<style>

</style>
2
3
4
5
6
7
8
9
10
11
12
13
14
15
16
17
18
19
20
21
22
23
24
25
26
27
使用 mapState, mapMutations 辅助函数简化代码
export default {
  name: 'App',
  computed: {
    /* count1() {
      return this.$store.state.count1;
    } */
    // 将 this.count1 为 this.$store.state.count1
    ...mapState(['count1'])
  },
  methods: {
    /* countIncrease() {
      this.$store.commit("countInc", 100);
    }, */
    // 将 `this.countInc(100)` 映射为 `this.$store.commit('countInc', 100)`
    ...mapMutations(['countInc']),
    countIncrease() {
      this.countInc(100);
    },
  }
}
2
3
4
5
6
7
8
9
10
11
12
13
14
15
16
17
18
19
20
实现 count2 和 count3
在state.js中增加
export default {
  count1: 0,
  count2: 0,
  count3: 0
}
2
3
4
5
在 mutations.js 中增加
export default {
  countInc(state, v) {
    state.count1 = state.count1 + v
  },
  increment(state) {
    state.count2++
  },
  incrementAsync(state) {
    state.count3++
  }
}
2
3
4
5
6
7
8
9
10
11
在 actions 中
export default {
  /* increment(context) {
    context.commit('increment')
  } */
  increment({
    commit
  }) {
    commit('increment')
  },
  incrementAsync({
    commit
  }) {
    setTimeout(() => {
      commit('incrementAsync')
    }, 1000)
  }
}
2
3
4
5
6
7
8
9
10
11
12
13
14
15
16
17
在 App.vue 中增加
<template>
  <div id="app">
    <h1>count1: {{count1}}</h1>
    <button @click="countIncrease">点我+100</button>
    <h1>count2: {{count2}}</h1>
    <button @click="incrementFn">点我+1</button>
    <h1>count3: {{count3}}</h1>
    <button @click="incrementAsyncFn">点我延时1秒+1</button>
    <h3>花名册</h3>
    <ul class="ul">
      <li v-for="item in people">姓名:{{item.name}}---年龄:{{item.age}}</li>
    </ul>
    <h3>年满十八</h3>
    <ul class="ul">
      <li v-for="item in adults">姓名:{{item.name}}---年龄:{{item.age}}</li>
    </ul>
  </div>
</template>

<script>
  import {
    mapState,
    mapMutations,
    mapActions
  } from 'vuex'
  export default {
    name: 'App',
    components: {},
    computed: {
      // 将 this.count 为 this.$store.state.count
      ...mapState([
        'count1',
        'count2',
        'count3'
      ])
    },
    methods: {
      // 将 `this.countInc(100)` 映射为 `this.$store.commit('countInc', 100)`
      ...mapMutations(['countInc']),
      countIncrease() {
        this.countInc(100);
      },

      // 将 `this.increment()` 映射为 `this.$store.dispatch('increment')`
      ...mapActions(['increment', 'incrementAsync']),
      incrementFn() {
        this.increment()
      },
      incrementAsyncFn() {
        this.incrementAsync()
      }
    }
  }
</script>

<style>

</style>
2
3
4
5
6
7
8
9
10
11
12
13
14
15
16
17
18
19
20
21
22
23
24
25
26
27
28
29
30
31
32
33
34
35
36
37
38
39
40
41
42
43
44
45
46
47
48
49
50
51
52
53
54
55
56
57
58
getter用法示例
在state.js中增加
export default {
  count1: 0,
  count2: 0,
  count3: 0,
  people: [{
      name: '小易',
      age: 20
    },
    {
      name: '小烊',
      age: 18
    },
    {
      name: '小千',
      age: 36
    },
    {
      name: '小玺',
      age: 27
    },
    {
      name: '小江',
      age: 24
    },
    {
      name: '小六',
      age: 8
    },
    {
      name: '小七',
      age: 6
    }
  ]
}
2
3
4
5
6
7
8
9
10
11
12
13
14
15
16
17
18
19
20
21
22
23
24
25
26
27
28
29
30
31
32
33
34
在 getters.js 中
export default {
  adults: (state) => {
    return state.people.filter(item => {
      if (item.age >= 18) {
        return true
      }
    })
  }
}
2
3
4
5
6
7
8
9
在 App.vue 中增加
<template>
  <div id="app">
    <h1>count1: {{count1}}</h1>
    <button @click="countIncrease">点我+100</button>
    <h1>count2: {{count2}}</h1>
    <button @click="incrementFn">点我+1</button>
    <h1>count3: {{count3}}</h1>
    <button @click="incrementAsyncFn">点我延时1秒+1</button>
    <h3>花名册</h3>
    <ul class="ul">
      <li v-for="item in people">姓名:{{item.name}}---年龄:{{item.age}}</li>
    </ul>
    <h3>年满十八</h3>
    <ul class="ul">
      <li v-for="item in adults">姓名:{{item.name}}---年龄:{{item.age}}</li>
    </ul>
  </div>
</template>

<script>
  import {
    mapState,
    mapGetters,
    mapMutations,
    mapActions
  } from 'vuex';
  export default {
    name: 'App',
    components: {},
    computed: {
      // 将 this.count 为 this.$store.state.count
      ...mapState([
        'count1',
        'count2',
        'count3',
        'people'
      ]),
      // 使用对象展开运算符将 getter 混入 computed 对象中
      ...mapGetters(['adults'])
    },
    methods: {
      // 将 `this.countInc(100)` 映射为 `this.$store.commit('countInc', 100)`
      ...mapMutations(['countInc']),
      countIncrease() {
        this.countInc(100);
      },

      // 将 `this.increment()` 映射为 `this.$store.dispatch('increment')`
      ...mapActions(['increment', 'incrementAsync']),
      incrementFn() {
        this.increment()
      },
      incrementAsyncFn() {
        this.incrementAsync()
      }
    }
  }
</script>

<style>

</style>
2
3
4
5
6
7
8
9
10
11
12
13
14
15
16
17
18
19
20
21
22
23
24
25
26
27
28
29
30
31
32
33
34
35
36
37
38
39
40
41
42
43
44
45
46
47
48
49
50
51
52
53
54
55
56
57
58
59
60
61
62
# 4.课程学习项目
# 4.1 项目简介
项目来源 vuex基础入门 (opens new window)
目标
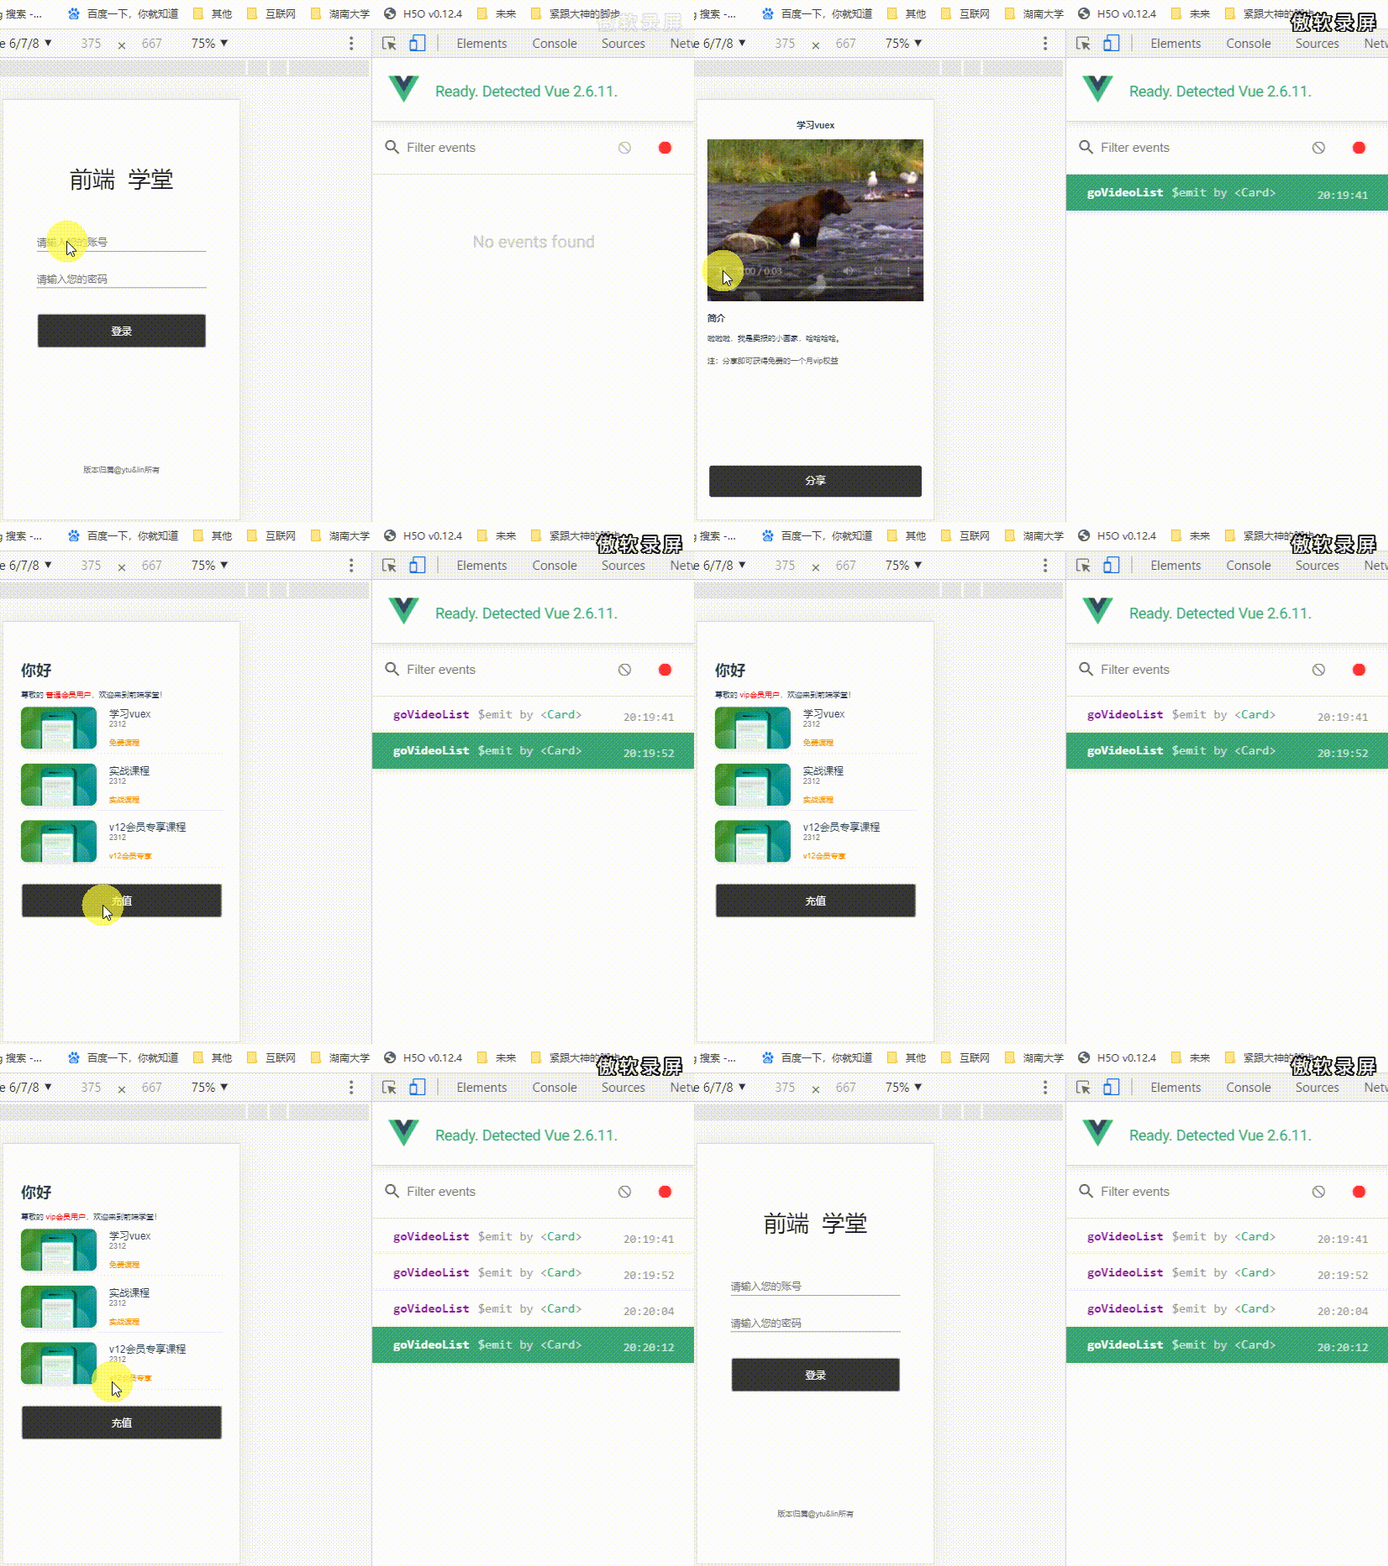
- 制作一个需要账号登录的课程学习项目
- 不同的课程需要不同的会员等级,实现购买会员功能,课程分享
功能
- 通过 state.userInfo 控制用户登录路由限制
- 多组件共享 state.userStatus 和 state.vipLevel 状态
- 多组件修改 state.userStatus 和 state.vipLevel
先看一下实现的效果
首先创建一个vue项目
vue init webpack projectName
安装 vuex vue-router less less-loader
npm install vuex --save
npm install vue vue-router --save
npm install less less-loader --save
在 src 下创建一个 store 目录, 新建以下文件:
- index.js
- state.js
- getters.js
- mutations.js
- actions.js
在 main.js 中引入和使用,同时创建全局的导航守卫
import Vue from "vue"
import App from "./App.vue"
import Vuex from "vuex"
import router from "./router"
import store from "./store"

Vue.config.productionTip = false

Vue.use(Vuex)

// 创建全局的导航守卫
router.beforeEach((to, from, next) => {
    if (store.state.userInfo || to.path === "/login") {
        next()
    } else {
        next({
            path: "/login"
        })
    }
})

new Vue({
  el: '#app',
  router,
  store,
  components: { App },
  template: '<App/>'
})
2
3
4
5
6
7
8
9
10
11
12
13
14
15
16
17
18
19
20
21
22
23
24
25
26
27
28
在 index.js 中
import Vue from 'vue'
import Vuex from 'vuex'
import state from './state'
import getters from './getters'
import mutations from './mutations'
import actions from './actions'

Vue.use(Vuex)

export default new Vuex.Store({
  state,
  getters,
  mutations,
  actions
})
2
3
4
5
6
7
8
9
10
11
12
13
14
15
router.js
import Vue from "vue"
import VueRouter from "vue-router"

Vue.use(VueRouter)

const router = new VueRouter({
    mode: "history",
    base: "/",
    routes: [
        {
            path: "/login",
            name: "login",
            component: () => import("./pages/login.vue")
        },
        {
            path: "/",
            name: "index",
            component: () => import("./pages/index.vue")
        },
        {
            path: "/userCenter",
            name: "userCenter",
            component: () => import("./pages/userCenter.vue")
        },
        {
            path: "/course/:id",
            name: "course",
            component: () => import("./pages/course.vue")
        }
    ]
})

export default router
2
3
4
5
6
7
8
9
10
11
12
13
14
15
16
17
18
19
20
21
22
23
24
25
26
27
28
29
30
31
32
33
在 state.js 中
export default {
    userInfo: "",
    userStatus: "",
    vipLevel: ""
}
2
3
4
5
userStatus 三种取值情况:0 -> 普通;1 -> vip;2-> 高级vip
getters.js
export default {
    memberInfo(state) {
        switch (state.userStatus) {
            case 0:
                return "普通会员"
            case 1:
                return "vip会员"
            case 2:
                return `高级V${state.vipLevel}会员`
            default:
                return "普通会员"
        }
    }
}
2
3
4
5
6
7
8
9
10
11
12
13
14
mutations.js
export default {
    login(state, v) {
        state.userInfo = v
    },
    // 创建用户信息
    setMemberInfo(state, v) {
        state.userStatus = v.userStatus
        state.vipLevel = v.vipLevel
    }
}
2
3
4
5
6
7
8
9
10
actions.js
import { resolve } from "any-promise"

export default {
    // 第二个参数表示要修改的数据
    buyVip({ commit }, e) {
      // 这里简单模拟一下异步操作, 模拟与后端的交互
        return new Promise((resolve, reject) => {
            // mock api 交互
            setTimeout(() => {
                // 修改本地state
                commit("setMemberInfo", {
                    userStatus: e.userStatus,
                    vipLevel: e.vipLevel
                })
                resolve("购买成功")
            }, 1000)
        })
    },
    getFreeVip({ commit, state }) {
        // mock api 交互
        return new Promise((resolve, reject) => {
            setTimeout(() => {
                if (state.userStatus === 0) {
                    commit("setMemberInfo", {
                        userStatus: 1,
                        vipLevel: 0
                    })
                    resolve("分享成功,您已获得一个月的高级vip会员")
                } else {
                    resolve("分享成功")
                }
            }, 1000)
        })
    }
}
2
3
4
5
6
7
8
9
10
11
12
13
14
15
16
17
18
19
20
21
22
23
24
25
26
27
28
29
30
31
32
33
34
35
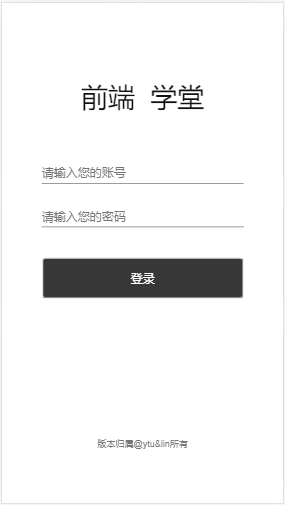
# 4.2 登录页面 login.vue
关键代码
<template>
  <div class="login">

    <button class="btn" @click="login">登录</button>

  </div>
</template>

<script>
  export default {
    data() {
      return {
        isHidden: false,
        isPassword: true,
        logs: [],
        form: {
          account: "",
          password: ""
        }
      };
    },
    methods: {
      login() {
        if (!this.form.account && !this.form.password) {
          alert("请填写账号密码");
          return false;
        }
        const that = this;
        setTimeout(() => {
          this.$store.commit("login", {
            account: that.form.account,
            password: that.form.password
          });
          // 假设拿到用户的数据,存到 store 里
          this.$store.commit("setMemberInfo", {
            userStatus: 0,
            vipLevel: 0
          });
          // 提交完成后,跳转到首页?
          that.$router.push("./");
        }, 500);
      }
    }
  };
</script>
2
3
4
5
6
7
8
9
10
11
12
13
14
15
16
17
18
19
20
21
22
23
24
25
26
27
28
29
30
31
32
33
34
35
36
37
38
39
40
41
42
43
44
45
与 mutations.js 结合看
export default {
    login(state, v) {
        state.userInfo = v
    },
    // 创建用户信息
    setMemberInfo(state, v) {
        state.userStatus = v.userStatus
        state.vipLevel = v.vipLevel
    }
}
2
3
4
5
6
7
8
9
10
# 4.3 首页 index.vue
登录成功后,进入首页 index.vue
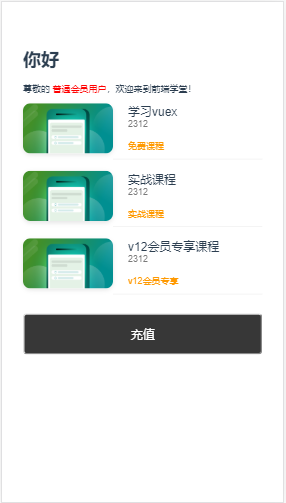
<template>
    <div class="index">
        <h1>你好</h1>
        <p class="text">
            尊敬的
            <!-- <span style="color: red;">{{this.$store.getters.memberInfo}}用户</span>,欢迎来到德莱联盟! -->
            <span style="color: red;">{{memberInfo}}用户</span>,欢迎来到前端学堂!
        </p>

        <button class="footer-opt btn" @click="recharge">充值</button>
    </div>
</template>

<script>
import card from "../components/card";
import { mapGetters, mapState } from "vuex";
export default {
    components: {
        card
    },
    data() {
        return {
            courseList: []
        };
    },
    computed: {
        ...mapState(["userStatus", "vipLevel"]),
        ...mapGetters(["memberInfo"])
    },
    mounted() {},
    methods: {
        recharge() {
            this.$router.push("./userCenter");
        },
        goVideoList(e) {
            const res = this.checkPermission(e);
            if (res) {
                this.$router.push({
                    name: "course",
                    params: {
                        id: e.id
                    }
                });
            } else {
                alert("权限不足,无法观看");
            }
        },
        checkPermission(e) {
            if (this.userStatus >= e.userStatus) {
                if (this.vipLevel >= e.vipLevel) {
                    return true;
                } else {
                    return false;
                }
            } else {
                return false;
            }
        }
    }
};
</script>
2
3
4
5
6
7
8
9
10
11
12
13
14
15
16
17
18
19
20
21
22
23
24
25
26
27
28
29
30
31
32
33
34
35
36
37
38
39
40
41
42
43
44
45
46
47
48
49
50
51
52
53
54
55
56
57
58
59
60
61
memberInfo 来自于
export default {
    memberInfo(state) {
        switch (state.userStatus) {
            case 0:
                return "普通会员"
            case 1:
                return "vip会员"
            case 2:
                return `高级V${state.vipLevel}会员`
            default:
                return "普通会员"
        }
    }
}
2
3
4
5
6
7
8
9
10
11
12
13
14
# 4.4 用户中心 userCenter.vue
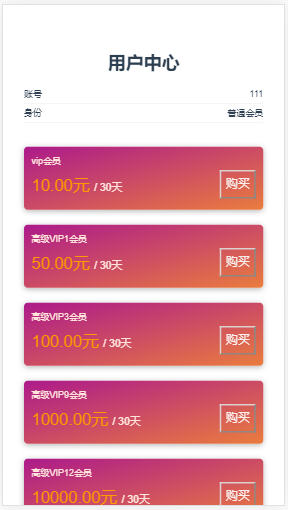
点击充值,进入用户中心 userCenter.vue
<template>
	<button class="item-content__btn" @click="buy(item)">购买</button>
</template>

<script>
import { mapState, mapGetters } from "vuex";
export default {
    data() {
        return {
            vipList: []
        };
    },
    computed: {
        ...mapState(["userInfo"]),
        ...mapGetters(["memberInfo"])
    },
    methods: {
        buy(e) {
            this.$store.dispatch("buyVip", e).then(res => {
                alert(res);
            });
        }
    }
};
</script>
2
3
4
5
6
7
8
9
10
11
12
13
14
15
16
17
18
19
20
21
22
23
24
25
26
触发 actions.js 中的
import { resolve } from "any-promise"

export default {
    // 第二个参数表示要修改的数据
    buyVip({ commit }, e) {
      // 这里简单模拟一下异步操作, 模拟与后端的交互
        return new Promise((resolve, reject) => {
            // mock api 交互
            setTimeout(() => {
                // 修改本地state
                commit("setMemberInfo", {
                    userStatus: e.userStatus,
                    vipLevel: e.vipLevel
                })
                resolve("购买成功")
            }, 1000)
        })
    }
}
2
3
4
5
6
7
8
9
10
11
12
13
14
15
16
17
18
19
# 4.5 课程页面 course.vue
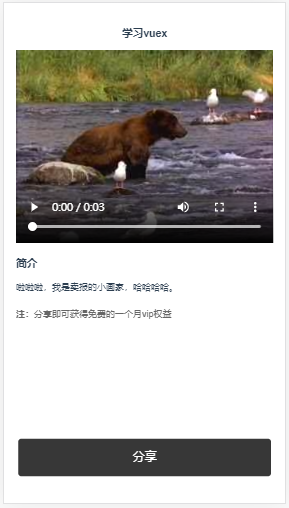
<template>
    <div class="course">
        <button class="share-btn" @click="share">分享</button>
    </div>
</template>

<script>
import { mapState, mapGetters } from "vuex";

export default {
    data() {
        return {};
    },
    methods: {
        share() {
            // 简单分享
            let c = confirm("课程分享,地址: http://www.muke.com");
            if (c) {
                // 修改state userStatus
                this.$store.dispatch("getFreeVip").then(res => {
                    alert(res);
                });
            } else {
                console.log("取消");
            }
        }
    }
};
</script>
2
3
4
5
6
7
8
9
10
11
12
13
14
15
16
17
18
19
20
21
22
23
24
25
26
27
28
29
这个页面要关注的是分享的功能,普通的会员用户点击分享按钮,确定后完成分享,即可获得免费的一个月的 VIP 权限,给它绑定一个 click 事件.
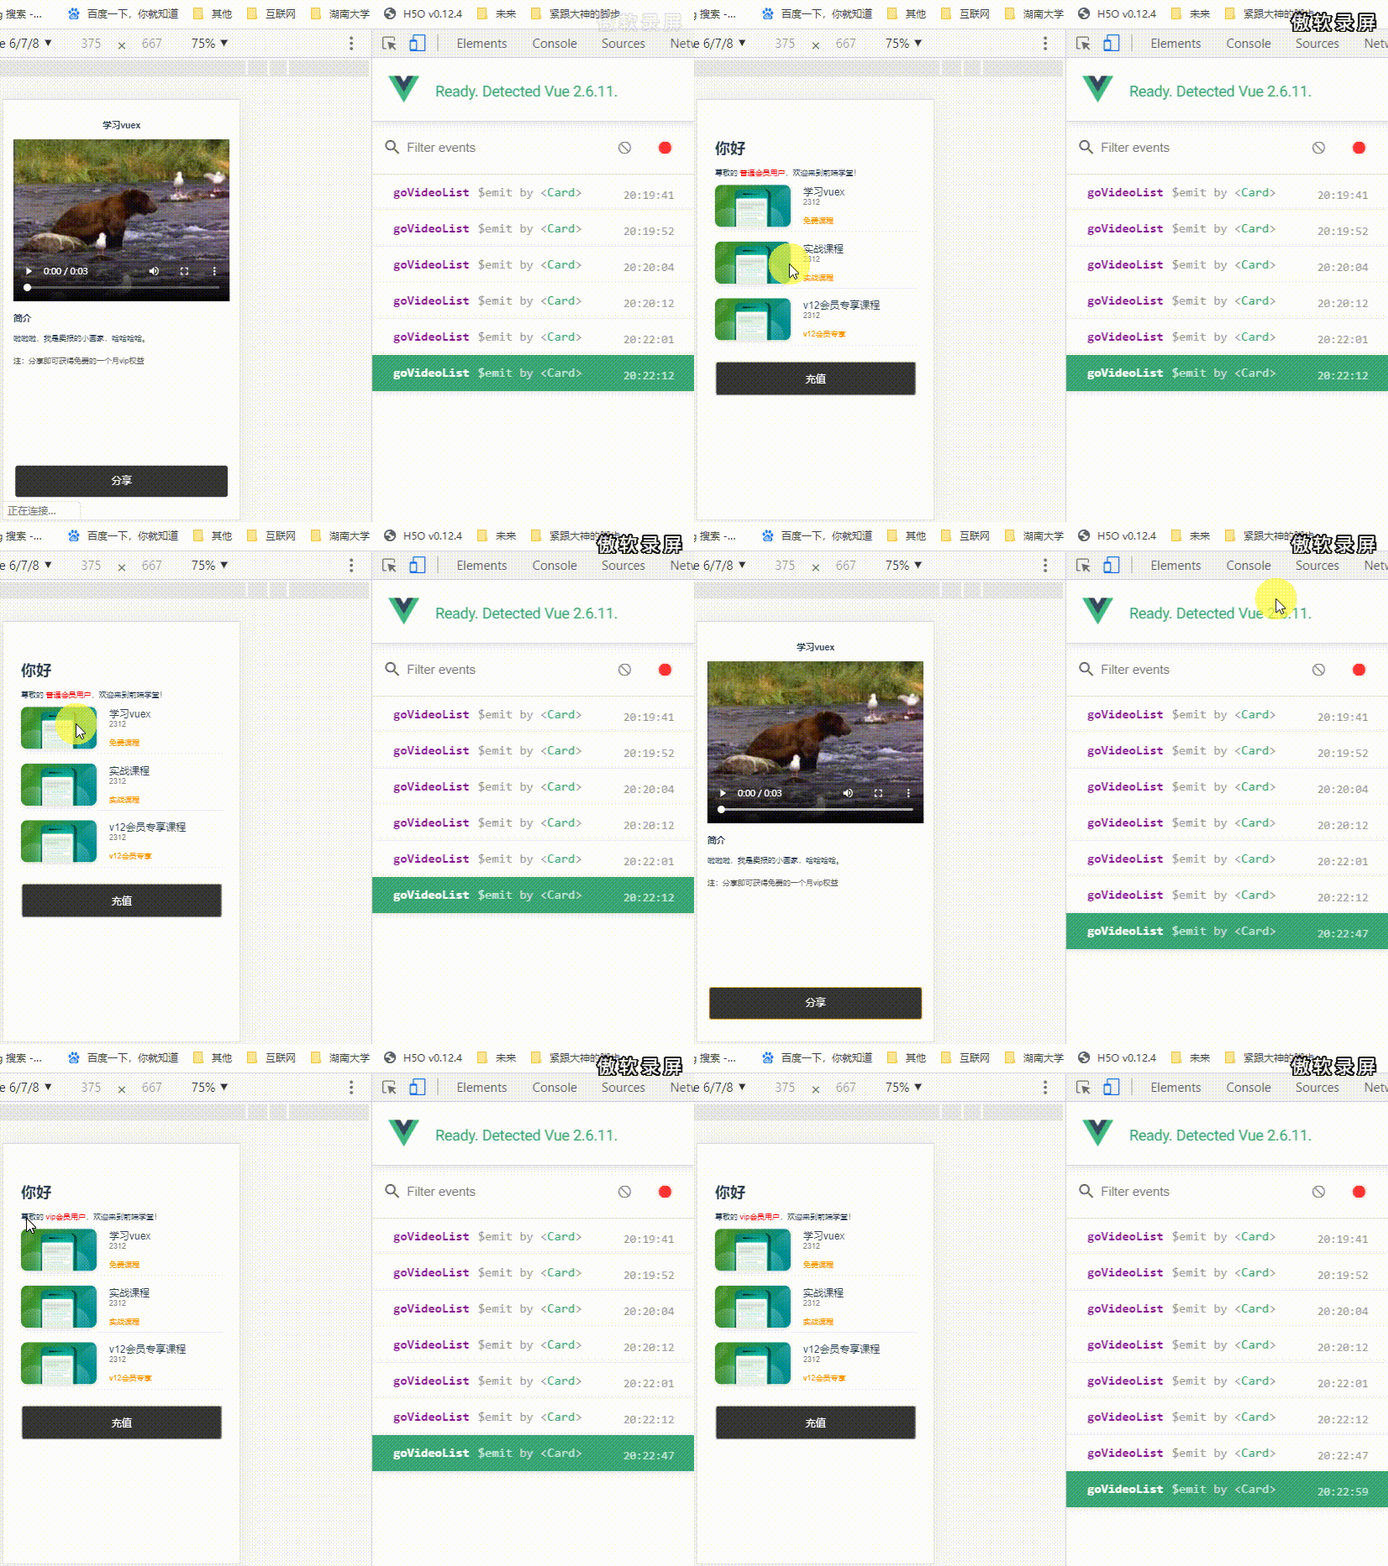
触发 actions.js 中的 getFreeVip
import { resolve } from "any-promise"

export default {
    getFreeVip({ commit, state }) {
        // mock api 交互
        return new Promise((resolve, reject) => {
            setTimeout(() => {
                if (state.userStatus === 0) {
                    commit("setMemberInfo", {
                        userStatus: 1,
                        vipLevel: 0
                    })
                    resolve("分享成功,您已获得一个月的高级vip会员")
                } else {
                    resolve("分享成功")
                }
            }, 1000)
        })
    }
}
2
3
4
5
6
7
8
9
10
11
12
13
14
15
16
17
18
19
20
完整的代码可以在我的仓库里查看。vuex-demo (opens new window)
# 5.项目中使用
可以参考我写的另一篇文章,Vue.js开发去哪儿网WebApp。 2.4 使用vuex实现数据共享 (opens new window)
# 6.继续学习
- 源码的学习--可以参考黄轶老师的《vue.js揭秘》
- 掘金文章--Vuex面试题汇总 (opens new window)
← Vue.js 学习笔记 数据绑定 →